How to Share and Stop Sharing Location on iPhone and iPad
There are many reasons why you need to share your location on your iPhone. For parents, for example, it is an excellent safety feature to monitor their children. Plus, friends can keep track of each other when visiting a new city for the first time. The good news is that you have multiple ways to share your GPS with someone else using your iOS device. This guide demonstrates these practical ways with details respectively.

In this article:
Part 1. How to Share Location on iPhone
How to Turn on Location Services on iPhone
There are several services and apps that allow you to share your location on your iPhone. Nevertheless, the first thing you need to do is turn on the Location Services on your device. Otherwise, anyone cannot get your GPS.
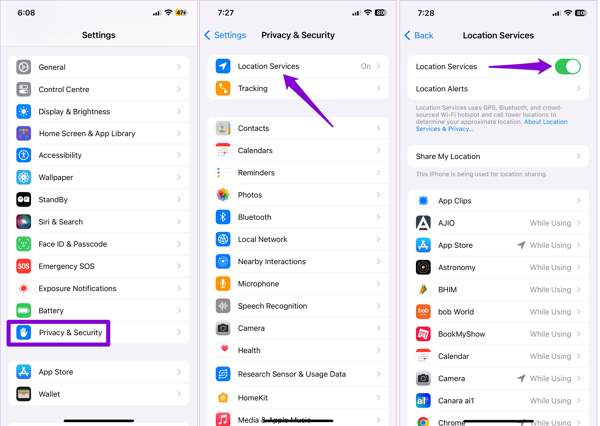
Run the Settings app, and go to the Privacy & Security or Privacy entry.
Choose Location Services, and toggle on the switch of Location Services.
Tap the app that you want to use for location sharing on the list, and select While Using the App or Ask Next Time OR When I Share.
Way 1: How to Share Location on iPhone with Family Members
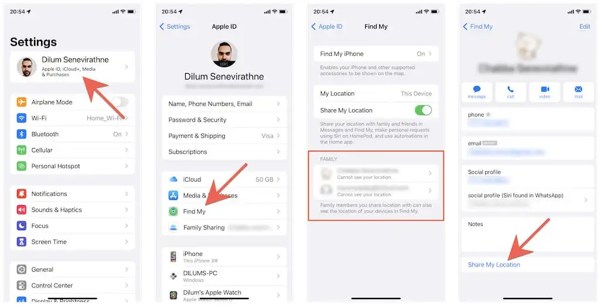
Run the Settings app, tap on your profile, and choose Find My.
Locate the FAMILY section, and choose who you want to share location on the list.
Next, tap Share My Location. The family member can view your location via Find My or Messages. When you want to stop sharing location on your iPhone, tap Stop Sharing Location on the contact's settings screen.
Way 2: How to Share Location on iPhone by Find My
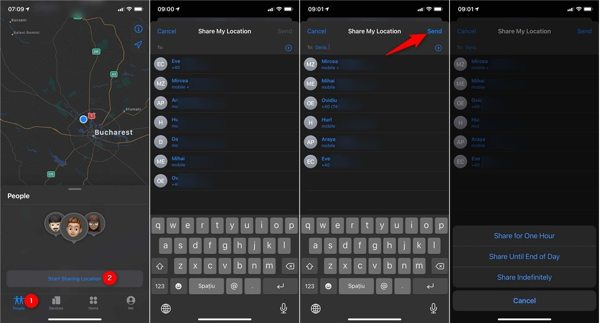
To share the location on your iPhone, run the Find My app.
Access the People tab at the bottom, tap Start Sharing Location, and select the contacts with who you want to share your location.
Next, tap the Send button, and select the duration of location sharing. Then tap OK to start sharing your location.
Note: The contacts who you select will get a notification about location sharing unless your Find My doesn't update locations. To stop sharing location on iPhone, tap Stop Sharing My Location in Find My.
Way 3: How to Share Location on iPhone via Apple Maps
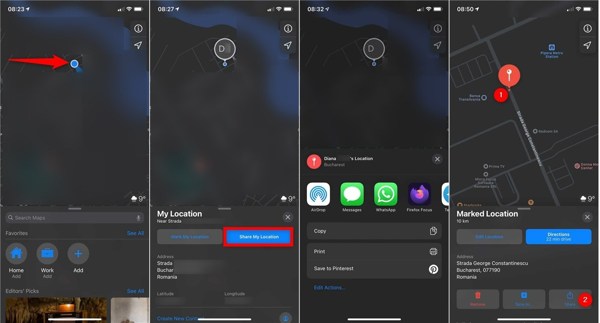
If you do not have the Find My app, open the Apple Maps app instead.
Once your iPhone is tracked on the map, you will see a blue dot indicator. Tap the indicator, and choose Share My Location.
Then you will get a proper channel. If you want to share location on your iPhone through text, for instance, choose Messages. Next, send your location via SMS.
Way 4: How to Do Location Sharing on iPhone in iMessage
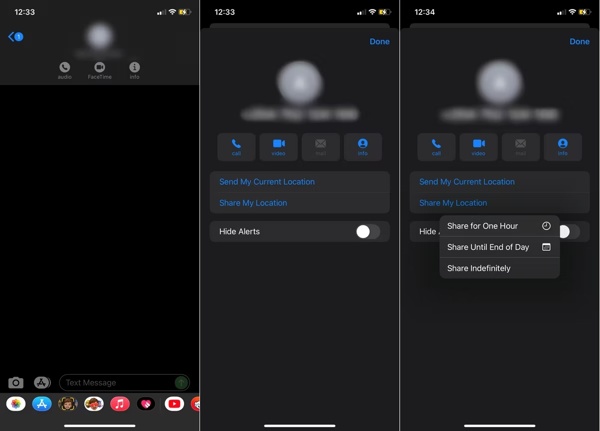
Open the Messages app, choose a chat with the person you hope to share your location with, or create a new conversation.
Tap on the contact profile at the top of the screen, select Info, and choose Send My Current Location or Share My Location.
Tip: If you choose Share My Location, set a period, like Share for One Hour.
If prompted, press Allow Once or Allow While Using App to grant iMessage access to your location.
Way 5: How to Share Your Location on iPhone in Contacts
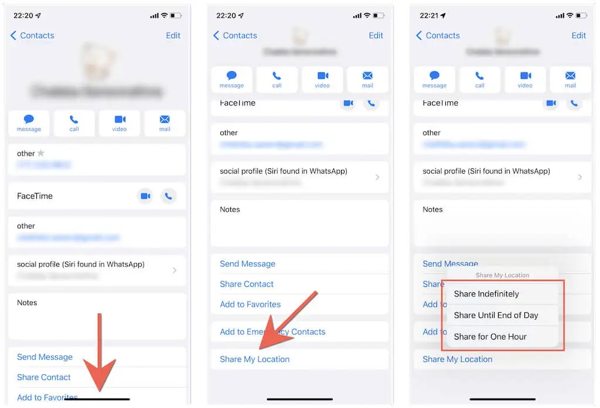
Open the Contacts app if you want to share your location on your iPhone with a specific person.
Tap the desired contact, press Share My Location, and choose the duration.
Then the recipient will get your location in Find My or Messages.
Note: The recipient must be an iPhone or iPad user. Location sharing will stop after the period or you can stop it manually by hitting Stop Sharing Location in Contacts.
Way 6: How to Share Location in WhatsApp on iPhone
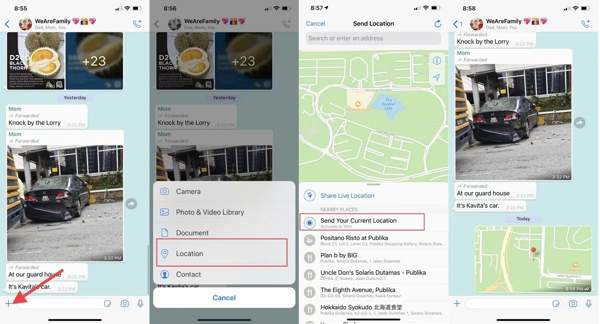
If you wish to share your location on WhatsApp, launch your instant messaging app.
Locate the conversation of the person you wish to share your location with. Tap the + button, and choose Location.
Select Send Your Current Location or Share Live Location. If prompted, choose a duration, and press the Send button.
Note: If you select Send Your Current Location, WhatsApp only shares a snapshot of your current location.
Way 7: How to Share Emergency Location on iPhone
If you hope to share your location during Emergency SOS, open the built-in Health app.
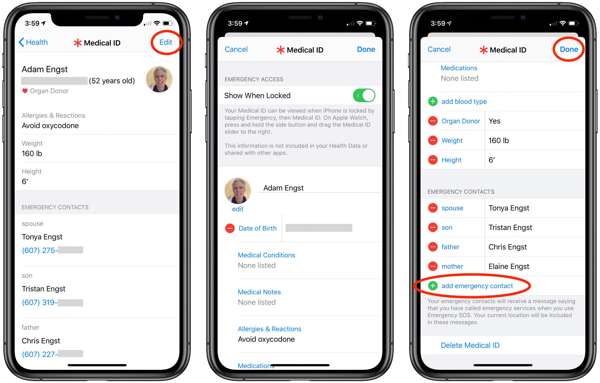
Tap on your profile, press the Edit button, tap add emergency contact, and add an emergency contact. You can add multiple contacts too.
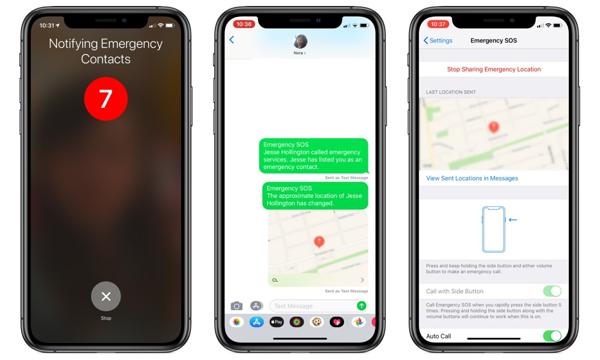
To share emergency location on iPhone via text, keep pressing the Side and one of the Volume buttons on iPhone 8 or later. For iPhone 7 or older, quickly press the Side button five times.
Then follow the on-screen instructions to notify emergency contacts with your current location.
Part 2. What to Do If I Can't Share My Location on iPhone
Some people ask why can't I share my location on my iPhone on the web. The reasons are complicated, such as improper settings, privacy settings, poor connection, or system faults. Anyway, there are proven solutions to fix iPhone location sharing not working.
Solution 1: Re-enable Location Services
When you can't share your location on an iPhone, the first thing you should do is check the Location Services feature. You must turn it on to send your location. If you have enabled it, turn it off, and turn it back on.
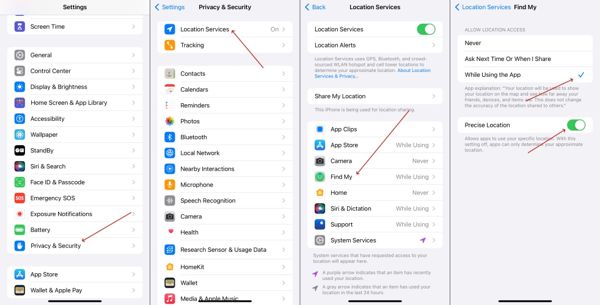
Run the Settings app.
Navigate to Privacy & Security, Location Services, and turn off Location Services.
A few seconds later, toggle on Location Services. Make sure to connect your iPhone to a stable internet connection.
Solution 2: Restart iPhone
Although restarting the iPhone is simple, the action can fix a variety of issues including cannot share location on the iPhone. It frees up space, releases background apps, and removes caches on iOS devices effectively.
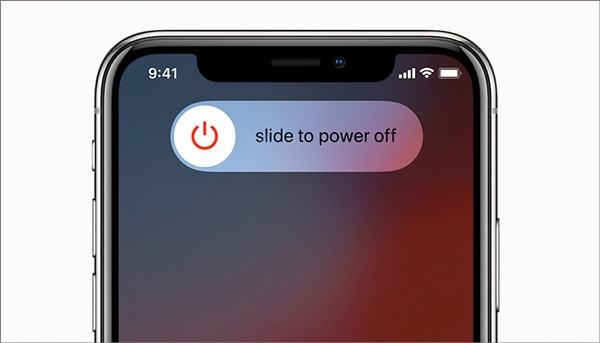
Keep pressing the Side button until the shut-down screen pops up.
Move the slider to the right side and your iPhone screen will become black.
Wait for a few seconds, and hold down the Side button until you see the Apple logo.
Solution 3: Check Restrictions in Screen Time
If you enable Screen Time on your iPhone, it may turn on the privacy restrictions, which block location sharing. Fortunately, you can adjust the settings and enable location sharing on your iPhone.
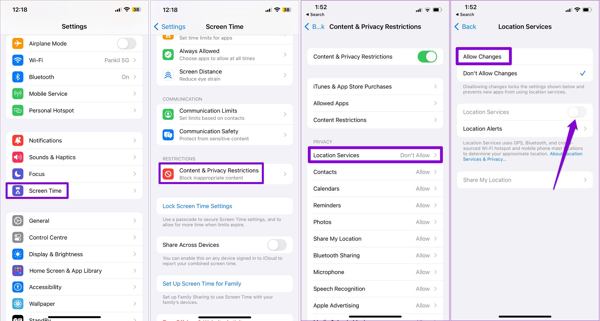
Open the Settings app.
Go to Screen Time, and tap Content & Privacy Restrictions.
Tap Location Services, select Allow Changes and toggle on Location Services.
Solution 4: Turn on Share My Location
You may encounter the Location Not Available error when sharing location on iPhone using Find My or iMessage. Now, you can make sure Share My Location is enabled for Find My in the Settings app.
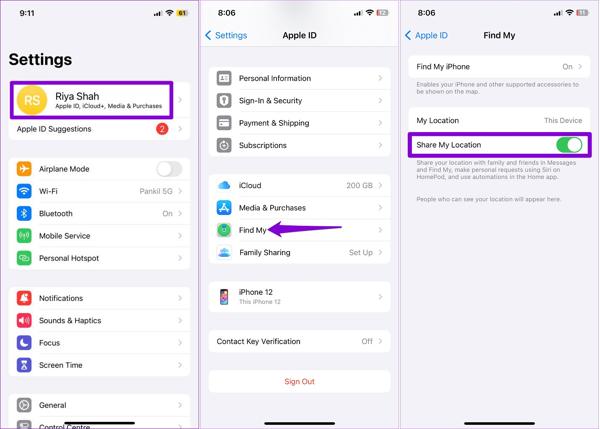
Tap on your profile in the Settings app.
Choose Find My, and toggle on the switch of Share My Location.
Solution 5: Enable Background App Refresh
If you cannot share your location on iPhone within apps, you should check the Background App Refresh feature. It syncs data when you are not using the apps including your live location sharing.
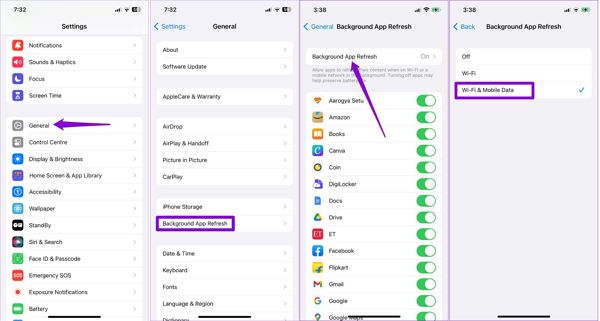
Head to General, Background App Refresh in the Settings app.
Tap Background App Refresh, and select Wi-Fi or Wi-Fi & Mobile Data according to your situation.
Solution 6: Correct Date and Time
iPhone relies on the correct date and time to improve GPS accuracy. If your date and time settings are wrong, you cannot share the location on your iOS device. You'd better enable the Set Automatically feature.
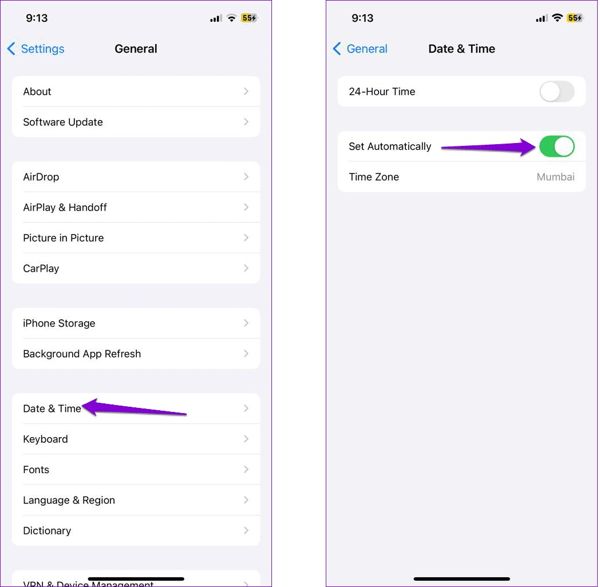
Go to the General tab in your Settings app.
Choose Date & Time.
Toggle on Set Automatically. Then iPhone will set the date and time according to the internet.
Solution 7: Reset Location & Privacy
If you have tried the solutions above but still cannot share your location on your iPhone, you should consider resetting the location settings to the default status. That won't erase data and files on your device.
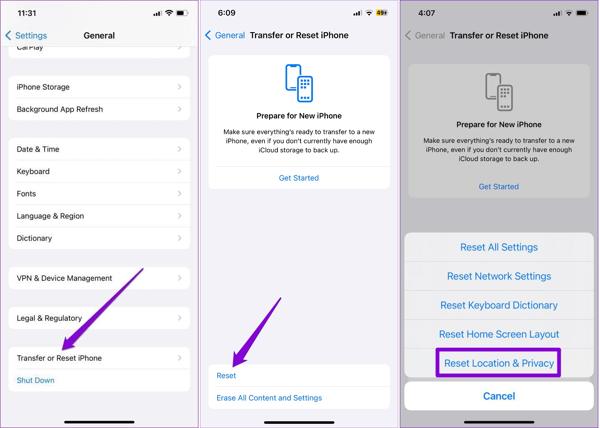
Start the Settings app.
Head to General, Transfer or Reset iPhone, and choose Reset.
Tap Reset Location & Privacy, and follow the instructions to finish it. Next, turn on Location Services, and share your location.
Solution 8: Update Software
Old versions of iOS may lead to a variety of issues including cannot share location. Apple suggests iPhone users keep their software up to date to enjoy the new features and fix bugs on their devices.
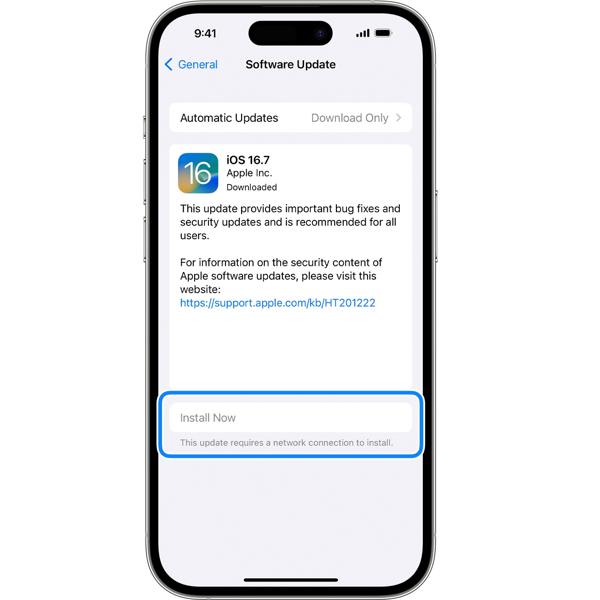
Go to Settings, General, and Software Update.
When an update is available, tap Install Now to update your software. Or you can turn on Automatic Updates to get the update automatically.
Part 3. How to Stop Sharing Location Without Them Knowing
As you can see, iOS automatically notifies the other side when you stop sharing your location. Can you stop sharing location on iPhone without them knowing? The answer is yes, and all you need is imyPass iLocaGo. It helps you change your location with fake addresses.
4,000,000+ Downloads
Stop sharing location without notifying.
Change to accurate addresses quickly.
Create virtual routes on iOS devices.
Offer multiple modes for various purposes.
Work for the latest versions of iOS.
Here are the steps to un-share location without someone knowing:
Connect to your iPhone
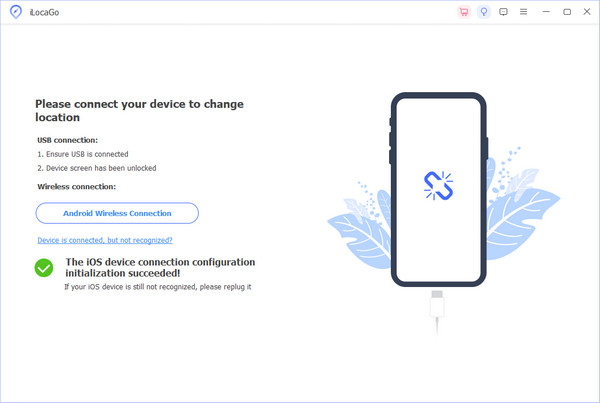
Launch the best iPhone spoofer software once you install it on your computer. Next, connect your iPhone to the computer with a Lightning cable. Make sure to trust this computer to grant the connection.
Choose Modify Location
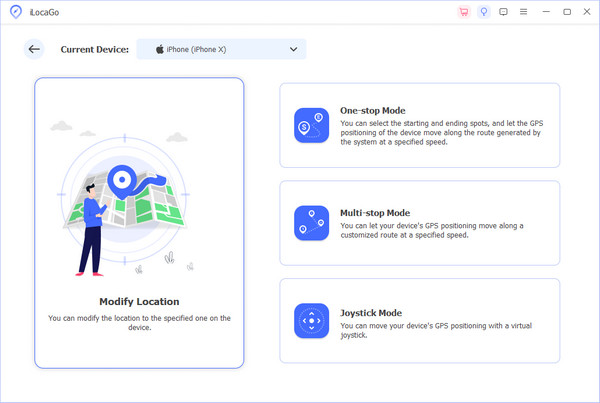
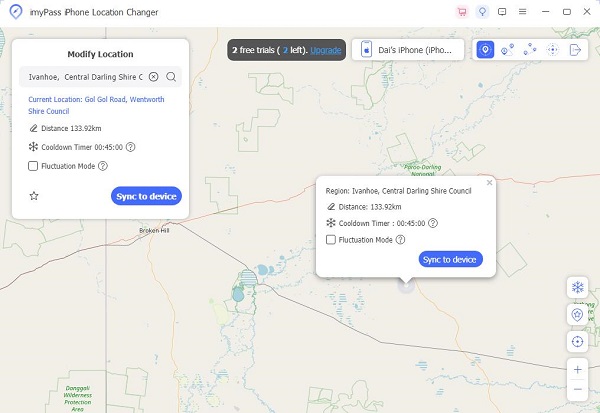
Once your iPhone is recognized, you will be taken to the home window. Here you can choose a proper mode to move on. To stop sharing location without notifying iMessage and other apps, we choose the Modify Location mode.
Stop sharing location
When the map window pops up, you have two ways to change to a fake location. If you have an accurate address, input it into the box on the Modify Location dialog, and hit the Sync to device button. If not, click a proper position on the map, check the address on the pop-up, and hit Sync to device to confirm it. With this program, you can also change location for Spotify to unlock more songs.
Conclusion
Following our comprehensive guide, you should understand how to get location sharing on your iPhone and fix it if the feature is not working. More importantly, you can stop location sharing on your iOS device without others knowing using imyPass iLocaGo. If you have other questions about this topic, please feel free to leave your message below this post and we will reply to it as soon as possible.
Hot Solutions
-
GPS Location
- Best Pokemon Go Locations with Coordinates
- Turn Your Location Off on Life360
- Fake Your Location on Telegram
- Review of iSpoofer Pokemon Go
- Set Virtual Locations on iPhone and Android
- Review of PGSharp App
- Change Location on Grindr
- Review of IP Location Finder
- Change Mobile Legends Location
- Change Location on Tiktok
-
Unlock iOS
-
iOS Tips
-
Unlock Android

