Warum zeigt mein iPhone „Datenwiederherstellung und Lösungen“ an?
Was bedeutet es, wenn das iPhone versucht, Daten wiederherzustellen? Wenn Benutzer in die iPhone versucht Datenwiederherstellung – Schleifebedeutet dies, dass das iPhone versucht, Daten wiederherzustellen, und Sie den Bildschirm nicht verlassen können. Warum tritt dieses Problem auf und wie kann es behoben werden? Lesen Sie mehr!

In diesem Artikel:
- Teil 1: Warum das iPhone versucht, Daten wiederherzustellen
- Teil 2: So beheben Sie das Problem beim Versuch einer Datenwiederherstellung auf dem iPhone
- Teil 3: So stellen Sie Daten wieder her, wenn der Versuch einer Datenwiederherstellung beim iPhone fehlschlägt
- Teil 4: Vorbeugende Tipps für den Versuch einer Datenwiederherstellung auf dem iPhone
Teil 1: Warum das iPhone versucht, Daten wiederherzustellen
Die Meldung „Datenwiederherstellung versucht“ wird angezeigt, wenn bei der Datenwiederherstellung Probleme auftreten. Es gibt drei Hauptgründe dafür, dass auf Ihrem iPhone-Bildschirm die Meldung „Datenwiederherstellung versucht“ angezeigt wird.
Schlechter Lagerraum
Angenommen, Sie erhalten mehrmals eine Benachrichtigung über unzureichenden Speicher und löschen den Speicher nicht rechtzeitig oder der Speicherplatz reicht nach dem Löschen immer noch nicht aus. In diesem Fall wird beim Neustart Ihres iPhones das Symbol „iPhone versucht Datenwiederherstellung“ auf Ihrem Bildschirm angezeigt.
Fehlgeschlagenes Update
Wenn Sie feststellen, dass Ihr iPhone nach einem Update versucht, Daten wiederherzustellen, liegt das daran, dass Sie das iOS-Update möglicherweise dadurch unterbrechen, dass Sie das iPhone beim Update über iTunes von Ihrem Computer trennen. Oder es treten beim Update Fehler und Kompatibilitätsprobleme auf.
Herabstufung des Betriebs
Beim Versuch, Ihr System auf eine frühere Version herunterzustufen, kann dieses Problem auftreten.
Sie haben gerade einen Jailbreak versucht
Sie haben Ihr Gerät direkt nach einem erfolgreichen Jailbreak aktualisiert. Obwohl Ihnen ein Jailbreak mehr benutzerdefinierte Optionen bietet, kann er auch zu Systeminstabilität und Problemen führen.
Wiederholt falsches Passwort
Einige Benutzer berichteten, dass bei ihnen ein Versuch zur Datenwiederherstellung auf dem iPhone aufgetreten sei, nachdem sie zu oft das falsche Passwort eingegeben hatten.
Teil 2: So beheben Sie das Problem beim Versuch einer Datenwiederherstellung auf dem iPhone
Warten Sie geduldig
Dieses Problem kann auftreten, wenn der Startversuch des iPhones aufgrund von Speichermangel fehlschlägt, was zu einer Schleife führt. Einige Benutzer berichteten, dass ihr iPhone nach einer Wartezeit von 30 Minuten bis mehreren Stunden wieder normal funktionierte. Wenn dieses Problem 24 Stunden später immer noch besteht, suchen Sie nach anderen Lösungen.
Drücken Sie die Home-Taste (falls vorhanden)
Wenn Ihr iPhone über eine Home-Taste verfügt, wird empfohlen, dass Sie die Home-Taste gedrückt halten. Nach einigen Minuten ist das Update möglicherweise erfolgreich abgeschlossen.
Neustart erzwingen
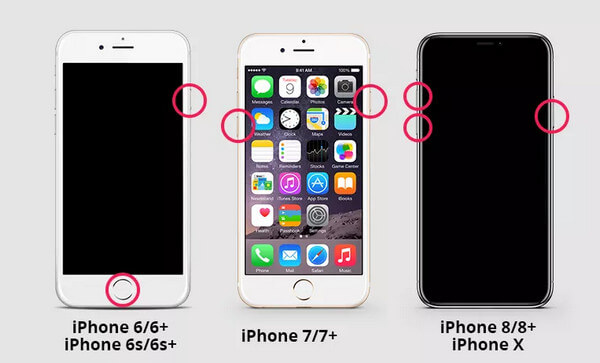
Ein Hard-Reset kann die meisten iPhone-Probleme lösen. Mit den folgenden Schritten können Sie Ihr iPhone zurücksetzen.
Wenn Sie ein iPhone 6, iPhone 6s, iPad oder iPod Touch verwenden:
Halten Sie die gedrückt Heim und Spitze Tasten gleichzeitig, bis das Apple-Logo erscheint, und lassen Sie dann die Tasten los.
Wenn Sie ein iPhone 7 oder iPhone 7 Plus verwenden:
Halten Sie die Lauter- und die Seitentaste gedrückt, bis das Apple-Logo angezeigt wird, und lassen Sie dann die Tasten los.
Wenn Sie ein iPhone 8 oder höher verwenden:
Drücken Sie kurz nacheinander die Lauter- und Leiser-Tasten und lassen Sie sie wieder los. Halten Sie dann kurz die Seitentaste gedrückt, bis das Apple-Logo erscheint.
Versetzen Sie das iPhone in den Wiederherstellungsmodus
Der Wiederherstellungsmodus kann Ihnen helfen ein deaktiviertes iPhone oder iPad reparieren. Zuvor sollten Sie sicherstellen, dass Sie Ihr iPhone gesichert haben. Anschließend können Sie die folgenden Schritte ausführen:
Verbinden Sie Ihr iPhone mit dem Computer. Stellen Sie sicher, dass iTunes vor dem Verbinden geschlossen ist.
Erzwingen Sie mit den oben beschriebenen Methoden einen Neustart Ihres iPhones, bis der Bildschirm „Wiederherstellungsmodus“ angezeigt wird.
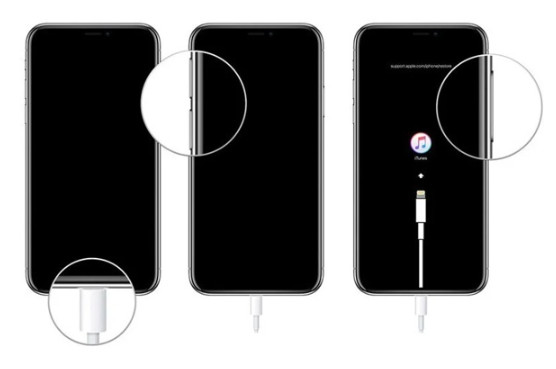
Öffnen Sie iTunes. Daraufhin wird ein Fenster mit der Meldung angezeigt: Es gibt ein Problem. Auswählen Aktualisieren oder Wiederherstellen.

Teil 3: So stellen Sie Daten wieder her, wenn der Versuch einer Datenwiederherstellung beim iPhone fehlschlägt
Sie sollten wissen, dass Sie alle iPhone-Daten verlieren, wenn der Versuch zur Datenwiederherstellung fehlschlägt. Daher ist es sehr wichtig zu wissen, wie Sie die Daten wiederherstellen können. Nachfolgend führen wir 3 Methoden auf.
Wiederherstellen über imyPass iPhone Data Recovery
Wenn Sie beim Versuch, Daten wiederherzustellen, auf das iPhone stoßen und dieser Versuch leider fehlschlägt, machen Sie sich keine Sorgen. Sie können die verlorenen Daten wiederherstellen über imyPass iPhone Datenrettung.
Damit können Sie:

Über 4.000.000 Downloads
Stellen Sie gelöschte oder verlorene Daten von iOS-Geräten ohne Datenverlust wieder her.
Stellen Sie Datentypen wie Fotos, Kontakte, Videos, Notizen usw. wieder her.
Sehen Sie sich vor der Wiederherstellung eine Vorschau detaillierter iOS-Dateien an.
Erledigen Sie Ihren Vorgang ganz einfach mit unserer intuitiven Benutzeroberfläche und unseren Funktionen.
Hier sind die Schritte zur Datenwiederherstellung mit diesem Tool:
Download imyPass iPhone Datenrettung indem Sie die Schaltfläche oben drücken. Starten Sie es nach der Installation.
Verbinden Sie Ihr iPhone über ein USB-Kabel mit Ihrem Computer. Vergessen Sie nicht, diesem Gerät auf Ihrem iPhone zu vertrauen.
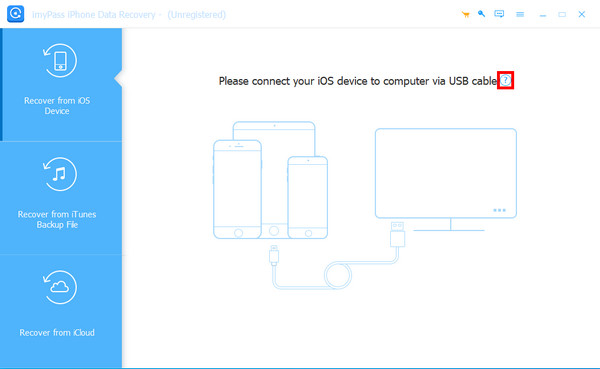
Wähle aus Wiederherstellen vom iOS-Gerät Option in der linken Navigationsleiste. Tippen Sie dann auf Scan starten um diesem Tool zu erlauben, Ihr iPhone nach weiteren Daten zu durchsuchen.
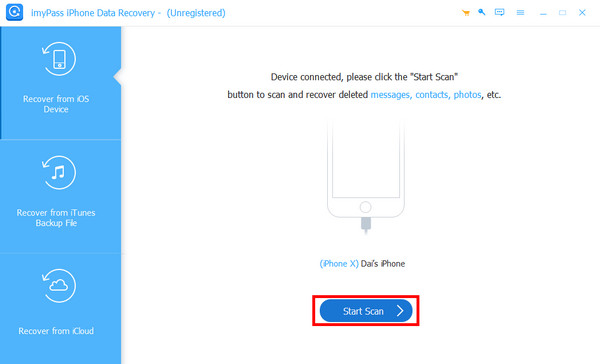
Warten Sie einen Moment. Dann werden auf der Benutzeroberfläche des Tools alle auf Ihrem iPhone gespeicherten Daten angezeigt.
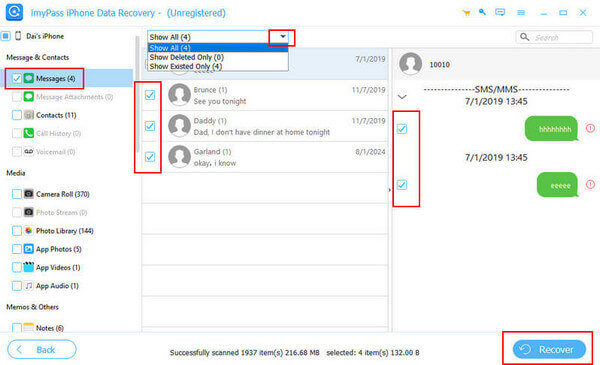
Lokalisieren Mitteilungen in der linken Navigationsleiste, und Sie sehen alle Nachrichten auf Ihrem iPhone auf der rechten Seite. Sie können die gelöschten Nachrichten filtern, indem Sie oben auf den Abwärtspfeil klicken und Nur gelöschte anzeigen.
Anschließend können Sie auf den Kontakt klicken und die gewünschte Nachricht markieren, die Sie abrufen möchten. Klicken Sie nach der Auswahl auf Genesen in der unteren rechten Ecke, um dem Tool den Befehl zu geben, den Vorgang zu starten.
iCloud
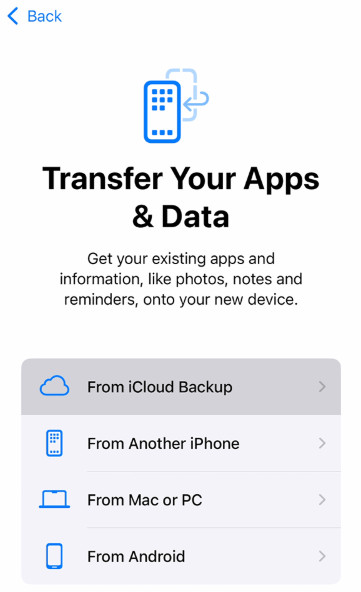
Wenn Sie regelmäßig Backups Ihrer Dateien erstellen, können Sie Nachrichten auch wiederherstellen, indem Sie das Backup wiederherstellen. Zuvor sollten Sie Setzen Sie Ihr iPhone auf die Werkseinstellungen zurück Erste.
Wählen Sie dann die Aus iCloud Backup Option, sobald Ihr iPhone neu gestartet ist, und starten Sie den Einrichtungsvorgang. Melden Sie sich dann mit Ihrer Apple-ID und Ihrem Passwort bei iCloud an. Wählen Sie das relevanteste Backup aus. Anschließend können Sie die Daten auf Ihrem iPhone abrufen.
iTunes
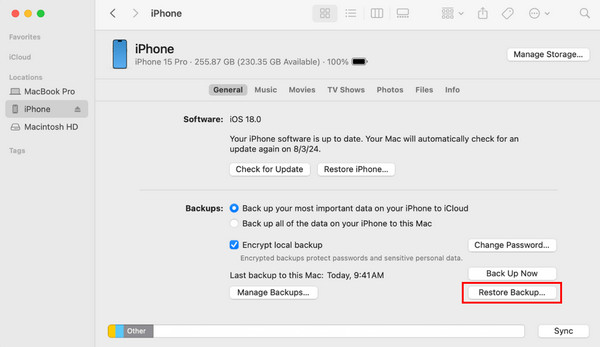
Verbinden Sie Ihr Gerät mit dem Computer und starten Sie iTunes auf dem Computer. Klicken Sie auf das Backup wiederherstellen und klicken Sie auf Synchronisieren unten. Dann warten Sie geduldig.
Teil 4: Vorbeugende Tipps für den Versuch einer Datenwiederherstellung auf dem iPhone
Führen Sie regelmäßig Sicherungskopien durch
Da bei der Datenwiederherstellung des iPhone das Risiko eines Datenverlusts hoch ist, ist es äußerst wichtig, Ihr iPhone regelmäßig zu sichern, sei es über iCloud oder iTunes.
Aktualisieren Sie Ihr iPhone mit einer stabilen Verbindung
Wenn Ihre WLAN-Verbindung immer wieder unterbrochen wird, ist die Wahrscheinlichkeit höher, dass während eines Updates Probleme auftreten. Versuchen Sie, einen Ort zu finden, an dem Sie während der Aktualisierung Ihres Telefons eine Verbindung zu einem stabilen, qualitativ hochwertigen Netzwerk herstellen können.
Wenn Sie Ihr iPhone mit Finder oder iTunes aktualisieren, trennen Sie Ihr Telefon nicht vom Computer, bis der Vorgang abgeschlossen ist.
Jailbreak mit Vorsicht
Durch das Jailbreaking Ihres iPhones eröffnen sich zwar alle möglichen neuen Anpassungsoptionen, Sie sollten jedoch bedenken, dass dadurch Ihr Telefon destabilisiert werden kann und es schwieriger wird, Support von Apple zu erhalten, falls etwas schiefgeht.
Schaffen Sie Speicherplatz auf Ihrem iPhone.
Da ein schlechter Speicher dazu führt, dass das iPhone versucht, die Daten wiederherzustellen, sollten Sie die unnötigen Datendateien häufiger löschen.
Fazit
Dieser Artikel analysiert, warum die iPhone meldet „Datenwiederherstellung wird versucht“, wie Sie den Versuch einer Datenwiederherstellung auf dem iPhone beenden, was zu tun ist, wenn der Vorgang fehlschlägt und einige nützliche Tipps. Wir hoffen, dass Sie das Problem mit unserer Anleitung lösen können.
iPhone Datenrettung
Gelöschte oder verlorene iPhone-Daten wiederherstellen
Herunterladen Herunterladen
