Πώς να απαλλαγείτε γρήγορα από το σφάλμα SIM Not Support στο iPhone
![]() Σάμουελ Σπένσερ Δημοσιεύθηκε στις Σεπτέμβριος 03, 2024Συμβουλές για iOS3 λεπτά ανάγνωση
Σάμουελ Σπένσερ Δημοσιεύθηκε στις Σεπτέμβριος 03, 2024Συμβουλές για iOS3 λεπτά ανάγνωση
"Βάζω μια νέα κάρτα SIM στο iPhone μου και λέει η SIM Not Support, τι κάνω;" Είναι συναρπαστικό όταν αποκτάς ένα νέο iPhone και εξερευνάς πολλές δυνατότητες, συμπεριλαμβανομένων των υπηρεσιών της Apple. Ωστόσο, δεν μπορείτε να πραγματοποιείτε τηλεφωνικές κλήσεις ή να στέλνετε και να λαμβάνετε μηνύματα κειμένου εάν το iPhone σας δεν αναγνωρίζει την κάρτα SIM. Αυτό το άρθρο κοινοποιεί πέντε λύσεις για αποτελεσματική διόρθωση Η κάρτα SIM δεν υποστηρίζεται σε iPhone.

Σε αυτό το άρθρο:
Μέρος 1: Γιατί το iPhone λέει ότι η SIM δεν υποστηρίζεται
Πολλά γεγονότα μπορούν να οδηγήσουν στο σφάλμα SIM Not Supported στο iPhone. Στην πραγματικότητα, είναι ένα κοινό σφάλμα και πολλοί χρήστες iPhone έχουν αντιμετωπίσει ή αντιμετωπίζουν το πρόβλημα. Οι κύριοι λόγοι περιλαμβάνουν:
1. Η κάρτα SIM είναι εκτός υποδοχής κάρτας ή έχει τοποθετηθεί λανθασμένα.
2. Το iPhone σας είναι κλειδωμένο σε μια συγκεκριμένη εταιρεία κινητής τηλεφωνίας και η κάρτα SIM δεν είναι συμβατή.
3. Ξεπερασμένες ρυθμίσεις φορέα.
4. Απαρχαιωμένο λογισμικό.
5. Σύγκρουση και ακατάλληλες ρυθμίσεις δικτύου.
Μέρος 2: 5 λύσεις για τη διόρθωση της SIM του iPhone που δεν υποστηρίζεται
Λύση 1: Τοποθετήστε ξανά την κάρτα SIM
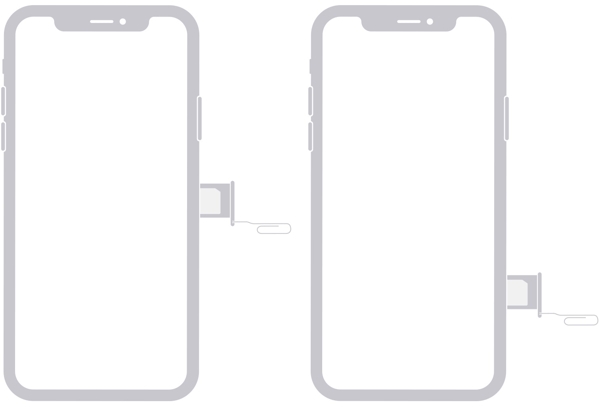
Αν δείτε ότι η κάρτα SIM δεν υποστηρίζεται iPhone 13 ή παλαιότερο, τοποθετήστε ένα εργαλείο εξαγωγής SIM στην οπή δίπλα στη θήκη SIM. Σπρώξτε προς τα μέσα και αφαιρέστε τη θήκη SIM. Στη συνέχεια, προσαρμόστε την κάρτα στο δίσκο μέχρι να εφαρμόζει πλήρως στην εγκοπή. Στη συνέχεια, τοποθετήστε το δίσκο SIM και ελέγξτε εάν το σφάλμα εξαφανίζεται.
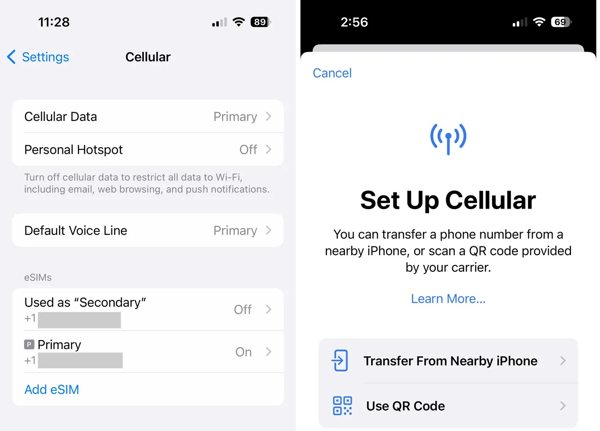
Για iPhone 14 ή νεότερο που αγοράστηκε στις Ηνωμένες Πολιτείες, δεν υπάρχει δίσκος SIM. Πρέπει να ρυθμίσετε την eSIM από την παλιά συσκευή. Εάν χρησιμοποιείτε ένα παλιό iPhone, ενημερώστε το σε iOS 16 ή νεότερη έκδοση και ενεργοποιήστε το Bluetooth. Γυρίστε στο νέο iPhone, μεταβείτε στο Ρυθμίσεις, Κυτταρικός, Ρύθμιση κινητής τηλεφωνίαςκαι πατήστε Μεταφορά από κοντινό iPhone. Στη συνέχεια, ακολουθήστε τις οδηγίες για να μετατρέψετε τη φυσική SIM σε eSIM για να διορθώσετε την κάρτα SIM Δεν υποστηρίζεται στο iPhone 15. Για ένα παλιό τηλέφωνο Android, πρέπει να επικοινωνήσετε με την εταιρεία κινητής τηλεφωνίας σας για να ολοκληρώσετε τη ρύθμιση της eSIM.
Λύση 2: Ξεκλείδωμα περιορισμού φορέα
Εάν αγοράσετε ένα iPhone από έναν πάροχο δικτύου αλλά όχι από την Apple, οι πιθανότητες είναι ότι η συσκευή σας είναι κλειδωμένη στον πάροχο κινητής τηλεφωνίας σας. Όταν μεταβαίνετε σε άλλη εταιρεία κινητής τηλεφωνίας, θα εμφανιστεί το σφάλμα iPhone SIM Not Supported. Αλλά αν έχετε ένα iPhone κλειδωμένο από την εταιρεία κινητής τηλεφωνίας, θα πρέπει να πληρώσετε για να το κάνετε α iPhone ξεκλειδωμένο από την εταιρεία κινητής τηλεφωνίας.
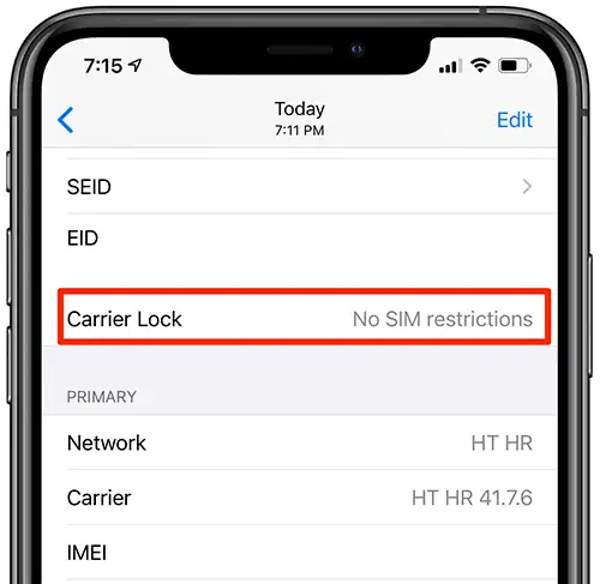
Εκτελέστε το Ρυθμίσεις εφαρμογή, επιλέξτε Γενικός, πατήστε Σχετικά μεκαι ελέγξτε το Κλειδαριά μεταφοράς επιλογή. Εάν δεν βλέπετε το μήνυμα Χωρίς περιορισμούς SIM, επικοινωνήστε με την υποστήριξη της εταιρείας κινητής τηλεφωνίας και ζητήστε της να ξεκλειδώσει τη συσκευή σας.
Λύση 3: Ενημέρωση ρυθμίσεων φορέα
Από προεπιλογή, το iOS εγκαθιστά αυτόματα την ενημέρωση των ρυθμίσεων της εταιρείας κινητής τηλεφωνίας. Ωστόσο, μπορεί να σταματήσει να λειτουργεί σε ορισμένες περιπτώσεις, όπως όταν το iPhone σας είναι εκτός σύνδεσης. Εάν η κάρτα SIM δεν υποστηρίζεται συνεχίζει να εμφανίζεται στο iPhone σας, ενημερώστε τις ρυθμίσεις της εταιρείας κινητής τηλεφωνίας με μη αυτόματο τρόπο.
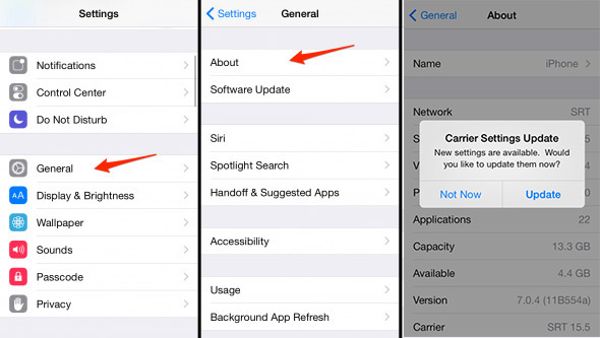
Εκτελέστε το Ρυθμίσεις εφαρμογή, μεταβείτε στο Γενικός καρτέλα και επιλέξτε Σχετικά με.
Περιμένετε μερικά δευτερόλεπτα για να αφήσετε το iOS να αναζητήσει την ενημέρωση. Εάν σας ζητηθεί, πατήστε το Εκσυγχρονίζω κουμπί για να ενημερώσετε τις ρυθμίσεις της εταιρείας κινητής τηλεφωνίας.
Λύση 4: Ενημέρωση iOS μέχρι σήμερα
Εάν εξακολουθείτε να χρησιμοποιείτε την παλιά έκδοση του iOS, είναι καιρός να ενημερώσετε το λογισμικό σας όταν το iPhone εμφανίσει το σφάλμα SIM Not Supported. Η Apple διορθώνει διάφορα σφάλματα σε κάθε ενημέρωση λογισμικού. Επομένως, καλύτερα να διατηρείτε το iOS σας ενημερωμένο.
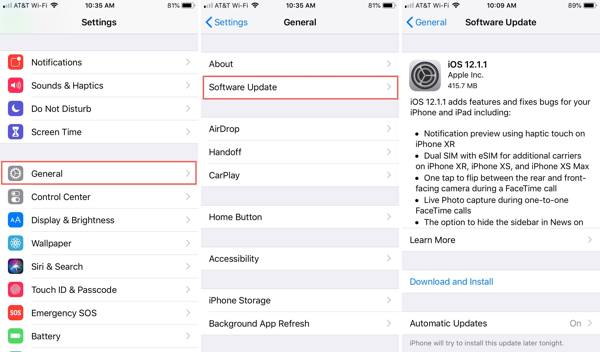
Παω σε Γενικός στο Ρυθμίσεις εφαρμογή.
Παρακέντηση Αναβάθμιση λογισμικού για να αναζητήσετε διαθέσιμες ενημερώσεις.
Στη συνέχεια, πατήστε το Λήψη και εγκατάσταση και ακολουθήστε τις οδηγίες που εμφανίζονται στην οθόνη για να ενημερώσετε το λογισμικό στη συσκευή σας.
Λύση 5: Επαναφορά ρυθμίσεων δικτύου
Η επαναφορά των ρυθμίσεων δικτύου είναι μια εύχρηστη λύση για τη διόρθωση του σφάλματος SIM Not Supported στο iPhone. Φέρνει τις ρυθμίσεις δικτύου στην εργοστασιακή κατάσταση, αλλά δεν θα διαγράψει τα δεδομένα ή τα αρχεία σας στη συσκευή σας. Ωστόσο, μόλις επαναφέρετε τις ρυθμίσεις δικτύου, η αποθηκευμένη σύνδεση Wi-Fi θα ξεχαστεί. Μπορείτε κοινοποιήστε τον κωδικό πρόσβασης Wi-Fi από άλλο iPhone.
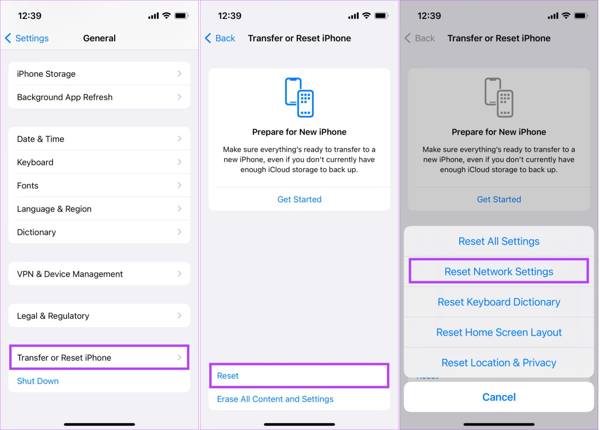
Παω σε Γενικός στην εφαρμογή Ρυθμίσεις και επιλέξτε Μεταφορά ή επαναφορά iPhone.
Παρακέντηση Επαναφοράκαι επιλέξτε Επαναφορά ρυθμίσεων δικτύου.
Όταν σας ζητηθεί, εισαγάγετε τον κωδικό πρόσβασης iPhone και ξεκινήστε την επαναφορά. Περιμένετε να ολοκληρωθεί η διαδικασία και επανεκκινήστε τη συσκευή σας. Η κάρτα SIM θα πρέπει να λειτουργεί κανονικά.
Προτείνετε: Το καλύτερο εργαλείο αφαίρεσης κλειδώματος ενεργοποίησης
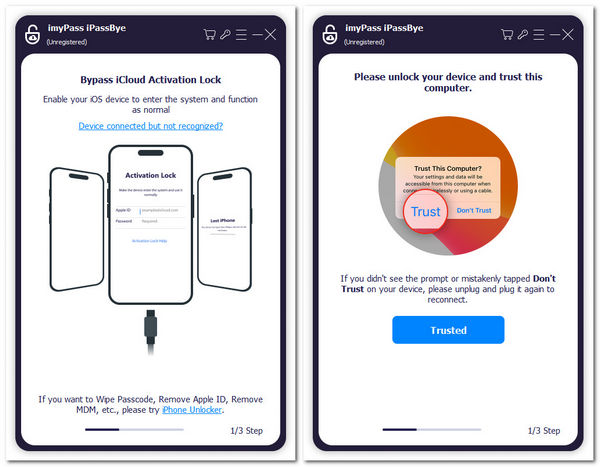
imyPass iPassBye είναι η καλύτερη επιλογή για να αφαιρέσετε το iCloud Activation Lock από συσκευές iOS. Ενσωματώνει λειτουργίες επαγγελματικού επιπέδου με τρόπο που όλοι μπορούν να μάθουν γρήγορα. Αυτό το καθιστά μια καλή επιλογή για αρχάριους και απλούς ανθρώπους.

4.000.000+ λήψεις
Αφαιρέστε το κλείδωμα ενεργοποίησης στο iPhone χωρίς τον κωδικό πρόσβασης.
Διατίθεται σε διάφορες καταστάσεις, συμπεριλαμβανομένης της χαμένης λειτουργίας.
Εύκολο στη χρήση και δεν απαιτεί τεχνικές δεξιότητες.
Υποστηρίξτε την πιο πρόσφατη έκδοση iOS και iPhone.
συμπέρασμα
Τώρα, θα πρέπει να καταλάβετε τι μπορείτε να κάνετε όταν το Η SIM του iPhone δεν υποστηρίζεται Παρουσιάζεται σφάλμα. Αν και οι λόγοι είναι περίπλοκοι, οι λύσεις μας μπορούν να σας βοηθήσουν να απαλλαγείτε από το πρόβλημα αποτελεσματικά και γρήγορα. Το imyPass iPassBye σάς επιτρέπει να καταργήσετε εύκολα το Κλείδωμα ενεργοποίησης.

Ο Samuel είναι ανώτερος συντάκτης από το imyPass. Είναι ειδικός στο ξεκλείδωμα με κωδικό πρόσβασης. Έχει πάνω από πέντε χρόνια εμπειρίας στη συγγραφή εκπαιδευτικών κειμένων για το ξεκλείδωμα τηλεφώνου.
Hot Solutions
-
Συμβουλές για iOS
-
Ξεκλειδώστε το iOS
-
Τοποθεσία GPS
-
Συμβουλές για τα Windows
