Πώς να ανακτήσετε το iPad από το iCloud/iTunes Backup και πολλά άλλα
Αν και το iPad έχει συνήθως πολύ λιγότερα σφάλματα από τις παραδοσιακές ψηφιακές συσκευές, η απώλεια δεδομένων είναι ένα μεγάλο πρόβλημα που έχουν αντιμετωπίσει πολλοί χρήστες iPad. Μπορεί να διαγράψετε σημαντικά αρχεία κατά λάθος ή να επαναφέρετε εργοστασιακά τη συσκευή σας λόγω διαφόρων σφαλμάτων. Τα καλά νέα είναι ότι μπορείτε ανακτήστε ένα iPad με ή χωρίς αντίγραφο ασφαλείας. Αυτός ο οδηγός θα εξηγήσει πώς μπορείτε να ανακτήσετε τα δεδομένα σας από τη μνήμη iPad, το αντίγραφο ασφαλείας iCloud ή το αντίγραφο ασφαλείας iTunes/Finder.

Σε αυτό το άρθρο:
Μέρος 1: Μπορείτε να ανακτήσετε δεδομένα από το iPad
Εκτός από την επιστροφή χαμένων δεδομένων, η επαναφορά ενός iPad μπορεί να το ξεκλειδώσει χωρίς κωδικό πρόσβασης, να διορθώσει ένα απενεργοποιημένο iPad και να απαλλαγεί από ιούς και δυσλειτουργίες.
Η ανάκτηση δεδομένων από ένα iPad δεν είναι δύσκολη υπόθεση. Επιπλέον, έχετε περισσότερες από μία μεθόδους και ο τρόπος ανάκτησης των δεδομένων σας εξαρτάται από την κατάστασή σας. Εάν δημιουργείτε τακτικά αντίγραφα ασφαλείας του iPad σας στο iCloud ή στο iTunes/Finder, μπορείτε να επαναφέρετε γρήγορα το iPad σας από το αντίγραφο ασφαλείας. Φυσικά, το κόστος είναι η διαγραφή των τρεχόντων δεδομένων στο iPad σας.
Ακόμα κι αν δεν έχετε αντίγραφο ασφαλείας, είναι δυνατή η ανάκτηση του iPad σας. Μόλις διαγράψετε ένα αρχείο ή ένα στοιχείο στη συσκευή σας, δεν αφαιρείται από τη μνήμη σας. Αντίθετα, ο χώρος επισημαίνεται ως κενός. Πριν αντικατασταθεί το αρχείο από νέα δεδομένα, μπορείτε να το επαναφέρετε με ένα ισχυρό εργαλείο ανάκτησης δεδομένων.
Μέρος 2: Πώς να ανακτήσετε το iPad χωρίς αντίγραφο ασφαλείας
Όπως αναφέρθηκε προηγουμένως, μπορείτε να ανακτήσετε ένα iPad ακόμα κι αν δεν έχετε αντίγραφο ασφαλείας, αλλά χρειάζεστε ένα ισχυρό εργαλείο. Από αυτό το σημείο, προτείνουμε το imyPass iPhone Data Recovery. Σαρώνει χαμένα δεδομένα στη μνήμη iPad σε διάφορες περιπτώσεις, συμπεριλαμβανομένης της λειτουργίας ανάκτησης.
Κύρια χαρακτηριστικά του καλύτερου εργαλείου ανάκτησης δεδομένων iPad
1. Επαναφέρετε εύκολα ένα iPad χωρίς κωδικό πρόσβασης ή αντίγραφο ασφαλείας.
2. Εξαγωγή δεδομένων από το iCloud ή το iTunes χωρίς επαναφορά του iPad.
3. Υποστήριξη σχεδόν όλων των τύπων δεδομένων σε συσκευές iOS.
4. Προεπισκόπηση δεδομένων iPad για επιλεκτική ανάκτηση συγκεκριμένων στοιχείων.
5. Διατίθεται στις πιο πρόσφατες εκδόσεις του μοντέλου iPad.
Πώς να επαναφέρετε ένα iPad χωρίς κωδικό πρόσβασης ή αντίγραφο ασφαλείας
Συνδεθείτε στο iPad σας
Ανοίξτε το καλύτερο λογισμικό ανάκτησης δεδομένων iPad αφού το εγκαταστήσετε στον υπολογιστή σας. Το λογισμικό είναι συμβατό με Windows 11/10/8/7 και Mac OS X. Επιλέξτε το Ανάκτηση από συσκευή iOS καρτέλα στην αριστερή πλευρά. Συνδέστε το iPad σας στον υπολογιστή σας με ένα καλώδιο Lightning. Παρακέντηση Εμπιστοσύνη εάν το iPad είναι συνδεδεμένο στον υπολογιστή για πρώτη φορά.
Εάν θέλετε να ανακτήσετε ένα iPad από το iTunes ή το iCloud backup, επιλέξτε Ανάκτηση από το αρχείο αντιγράφου ασφαλείας του iTunes ή Ανάκτηση από το iCloud Backup Fileκαι ακολουθήστε τις οδηγίες που εμφανίζονται στην οθόνη για να προχωρήσετε.
Προεπισκόπηση δεδομένων iPad
Κάντε κλικ στο Ξεκινήστε τη σάρωση κουμπί για να ξεκινήσει η σάρωση του iPad σας. Όταν ολοκληρωθεί, θα εμφανιστεί το παράθυρο προεπισκόπησης. Εδώ μπορείτε να ελέγξετε τα ανακτήσιμα δεδομένα στο iPad σας ανά κατηγορία. Εάν θέλετε απλώς να δείτε τα διαγραμμένα αρχεία, επιλέξτε Εμφάνιση μόνο διαγραμμένων από την επάνω αναπτυσσόμενη λίστα.
Ανακτήστε το iPad
Επιτέλους, επιλέξτε τα στοιχεία και τα αρχεία που θέλετε να ανακτήσετε και κάντε κλικ στο Ανακτώ κουμπί στην κάτω δεξιά γωνία. Στη συνέχεια ορίστε έναν φάκελο εξόδου και πατήστε Ανακτώ πάλι. Διατηρήστε το iPad σας συνδεδεμένο κατά τη διάρκεια της διαδικασίας.
Μέρος 3. Πώς να ανακτήσετε τις διαγραμμένες υπενθυμίσεις από το iTunes Backup
Η επαναφορά του iPad από το iCloud backup είναι μια σχετικά γρήγορη διαδικασία. Λειτουργεί μέσω σταθερής σύνδεσης στο διαδίκτυο και δεν απαιτεί επιπλέον υλικό. Το μειονέκτημα είναι ότι πρέπει να έχετε ένα αντίγραφο ασφαλείας iCloud και να επαναφέρετε εργοστασιακά το iPad σας.
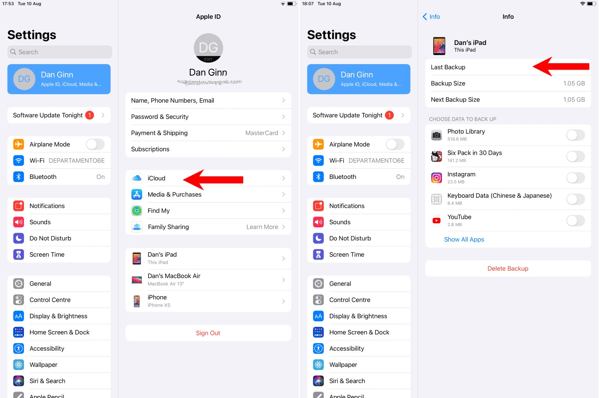
Εκτελέστε το Ρυθμίσεις εφαρμογή, πατήστε στο προφίλ σας, επιλέξτε iCloudκαι πατήστε Διαχείριση αποθηκευτικού χώρου.
Πατήστε το όνομα του iPad για να ελέγξετε αν έχετε αντίγραφο ασφαλείας iCloud. Εάν όχι, κάντε πρώτα ένα αντίγραφο ασφαλείας.
Επιστρέψτε στο Ρυθμίσεις οθόνη, επιλέξτε Γενικόςκαι πατήστε Μεταφορά ή επαναφορά του iPad ή Επαναφορά. Τύπος Διαγραφή όλου του περιεχομένου και των ρυθμίσεων.
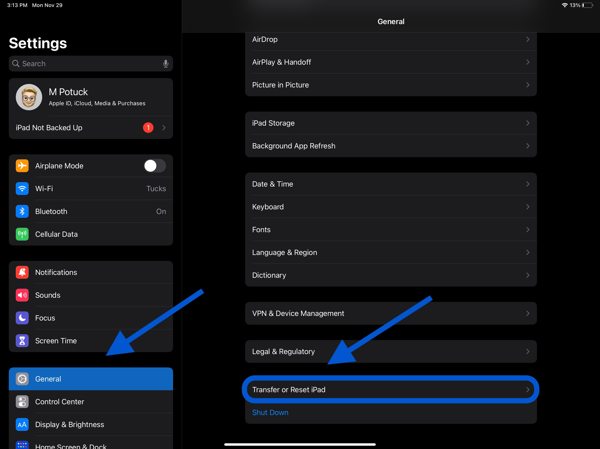
Εάν σας ζητηθεί, εισαγάγετε τον κωδικό πρόσβασης Apple ID ή τον κωδικό πρόσβασης iPad και πατήστε Εξάλειψη ή Να συνεχίσει για να ξεκινήσετε την επαναφορά της συσκευής σας.
Όταν ολοκληρωθεί η επαναφορά εργοστασιακών ρυθμίσεων, επανεκκινήστε το iPad και ρυθμίστε το ως νέα συσκευή. Συνδέστε τη συσκευή σας σε ένα δίκτυο Wi-Fi.
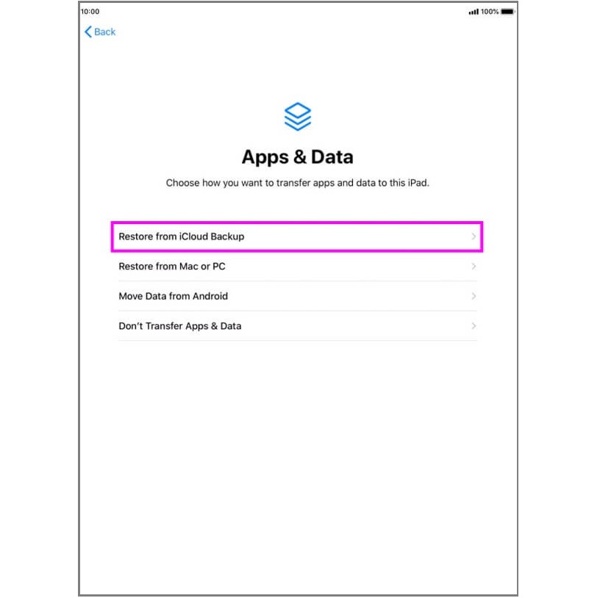
Φροντίστε να επιλέξετε Επαναφορά από το iCloud Backup στο Εφαρμογές και δεδομένα οθόνη. Συνδεθείτε στον λογαριασμό σας με το Apple ID και τον κωδικό πρόσβασής σας και επιλέξτε το σωστό αρχείο αντιγράφου ασφαλείας για επαναφορά από το αντίγραφο ασφαλείας στο iPad σας.
Στη συνέχεια, ολοκληρώστε τη διαδικασία εγκατάστασης.
Μέρος 4. Πώς να επαναφέρετε το iPad από το iTunes Backup
Μερικοί άνθρωποι προτιμούν να δημιουργούν αντίγραφα ασφαλείας των συσκευών τους iOS σε υπολογιστές, εν μέρει λόγω του περιορισμένου αποθηκευτικού χώρου στο cloud. Φυσικά, μπορείτε να επαναφέρετε το iPad με αντίγραφο ασφαλείας του iTunes. Επιπλέον, αυτή είναι μια αποτελεσματική λύση για τη διόρθωση διαφόρων σφαλμάτων, συμπεριλαμβανομένης της επαναφοράς του ξεχασμένου κωδικού πρόσβασης iPad.
Χρησιμοποιήστε ένα συμβατό καλώδιο για να συνδέσετε το iPad σας στον υπολογιστή που χρησιμοποιήσατε για τη δημιουργία αντιγράφων ασφαλείας της συσκευής σας. Φροντίστε να απενεργοποιήσετε το Find My iPad αν το έχετε ενεργοποιήσει.
Εάν η συσκευή σας είναι απενεργοποιημένη, πρέπει να επαναφέρετε το iPad σε λειτουργία ανάκτησης.
Για ένα iPad με κουμπί Home, κρατήστε πατημένο το Πλευρά + Σπίτι κουμπιά μέχρι να εμφανιστεί η οθόνη Recovery Mode.
Για iPad χωρίς κουμπί Home, πατήστε γρήγορα και αφήστε το Ενταση πάνω κουμπί και κάντε το ίδιο με το Χαμήλωσε το κουμπί. Στη συνέχεια κρατήστε το Πλευρά κουμπί μέχρι να δείτε την οθόνη Recovery Mode.
Τώρα, συνδέστε το iPad στον υπολογιστή σας με ένα καλώδιο USB.
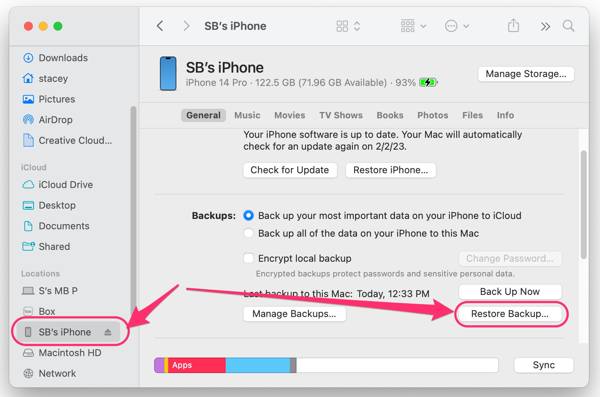
Εκτελέστε το iTunes σε Windows και macOS Mojave ή παλαιότερα, κάντε κλικ στο Τηλέφωνο κουμπί στην επάνω αριστερή γωνία και κατευθυνθείτε προς το Περίληψη αυτί. Σε macOS Catalina ή νεότερο, εκτελέστε την εφαρμογή Finder, πατήστε το όνομα του iPad και εντοπίστε το Καρτέλα Γενικά.
Κάντε κλικ στο Επαναφορά αντιγράφου ασφαλείας κουμπί κάτω από το Αντίγραφα ασφαλείας Ενότητα.
Τραβήξτε προς τα κάτω την επιλογή δίπλα στο Αντιγράφων ασφαλείας, επιλέξτε ένα κατάλληλο αρχείο αντιγράφου ασφαλείας και κάντε κλικ στο Επαναφέρω κουμπί. Μπορεί επίσης να χρειαστεί να εισαγάγετε το δικό σας Κωδικός ασφαλείας για το iTunes. αν το έχετε ορίσει ποτέ.
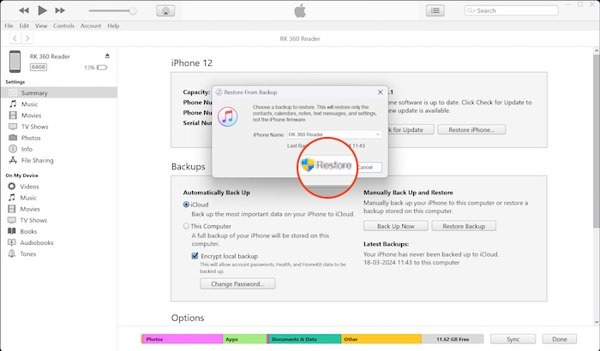
Όταν σας ζητηθεί, κάντε κλικ Διαγραφή και επαναφορά στο αναδυόμενο παράθυρο διαλόγου. Στη συνέχεια, ρυθμίστε το iPad σας και ολοκληρώστε την επαναφορά με το iTunes.
συμπέρασμα
Τώρα, θα πρέπει να καταλάβετε πώς να ανακτήσετε ένα iPad με αντίγραφο ασφαλείας iCloud και iTunes/Finder ή χωρίς αντίγραφο ασφαλείας. Το imyPass iPhone Data Recovery σάς δίνει τη δυνατότητα να ανακτήσετε χαμένα δεδομένα από τη μνήμη iPad χωρίς αντίγραφο ασφαλείας. Το πιο σημαντικό είναι ότι δεν θα διαγράψει τα τρέχοντα δεδομένα στη συσκευή σας. Εάν έχετε άλλες ερωτήσεις σχετικά με αυτό το θέμα, μη διστάσετε να τις γράψετε κάτω από αυτήν την ανάρτηση.

