Cómo deshacerse rápidamente del error de SIM no compatible en iPhone
![]() samuel spenser Publicado en 3 de septiembre de 2024Consejos para iOSlectura de 3 minutos
samuel spenser Publicado en 3 de septiembre de 2024Consejos para iOSlectura de 3 minutos
"Introduzco una nueva tarjeta SIM en mi iPhone y aparece el mensaje "SIM no compatible", ¿qué hago?" Es emocionante recibir un nuevo iPhone y explorar muchas funciones, incluidos los servicios de Apple. Sin embargo, no puedes hacer llamadas telefónicas ni enviar y recibir mensajes de texto si tu iPhone no reconoce la tarjeta SIM. Este artículo comparte cinco soluciones para solucionar el problema de manera efectiva. SIM no compatible con iPhone.

En este articulo:
Parte 1: ¿Por qué el iPhone dice que la tarjeta SIM no es compatible?
Hay muchos factores que pueden provocar el error de SIM no compatible en el iPhone. De hecho, es un error común y muchos usuarios de iPhone han experimentado o están experimentando este problema. Las principales razones incluyen:
1. Su tarjeta SIM está fuera de la ranura o colocada incorrectamente.
2. Su iPhone está bloqueado para un operador específico y la tarjeta SIM no es compatible.
3. Configuraciones del operador obsoletas.
4. Software obsoleto.
5. Conflictos y configuraciones de red incorrectas.
Parte 2: 5 soluciones para reparar la tarjeta SIM no compatible del iPhone
Solución 1: Vuelva a insertar su tarjeta SIM
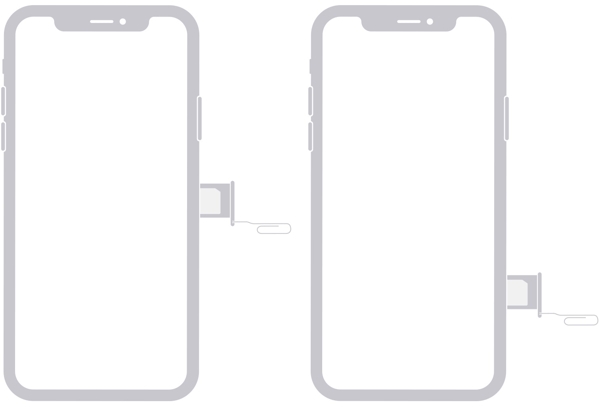
Si ves que la tarjeta SIM no es compatible con iPhone 13 o anterior, inserta una herramienta de extracción de tarjeta SIM en el orificio que se encuentra al lado de la bandeja SIM. Empuja y expulsa la bandeja SIM. Luego, ajusta la tarjeta en la bandeja hasta que encaje completamente en la muesca. A continuación, inserta la bandeja SIM y verifica si el error desaparece.
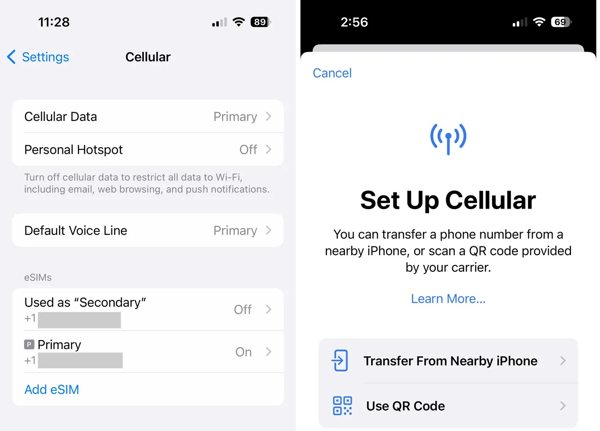
En el caso de los iPhone 14 o modelos más nuevos adquiridos en Estados Unidos, no hay bandeja para SIM. Debes configurar la eSIM desde el dispositivo anterior. Si estás usando un iPhone antiguo, actualízalo a iOS 16 o superior y activa la función de eSIM. Bluetooth. En el nuevo iPhone, navegue hasta Ajustes, Celular, Configurar celulary toque Transferencia desde un iPhone cercanoLuego, siga las instrucciones para convertir la SIM física a eSIM para solucionar el problema de SIM no compatible con iPhone 15. Para un teléfono Android antiguo, debe comunicarse con su operador para completar la configuración de eSIM.
Solución 2: Desbloquear la restricción del operador
Si compras un iPhone de un proveedor de red que no sea Apple, es probable que tu dispositivo esté bloqueado para tu operador. Cuando cambies a otro operador, aparecerá el error "SIM de iPhone no compatible". Pero si tienes un iPhone bloqueado por el operador, debes pagar para que sea un iPhone bloqueado. iPhone desbloqueado por el operador.
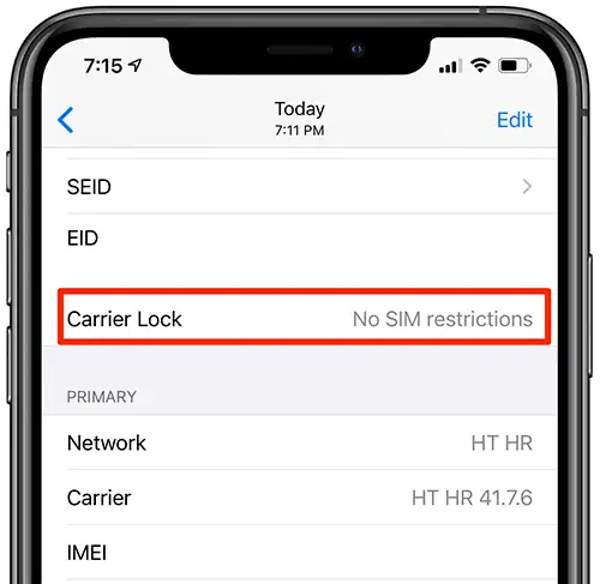
ejecutar el Ajustes aplicación, elige General, grifo Acerca de, y comprobar el Bloqueo del transportista Opción. Si no ve el mensaje Sin restricciones de SIM, comuníquese con el soporte de su operador y pídale que desbloquee su dispositivo.
Solución 3: Actualizar la configuración del operador
De forma predeterminada, iOS instala la actualización de la configuración del operador de forma automática. Sin embargo, puede dejar de funcionar en algunos casos, como cuando el iPhone está sin conexión. Si el mensaje "SIM no compatible" sigue apareciendo en el iPhone, actualiza la configuración del operador de forma manual.
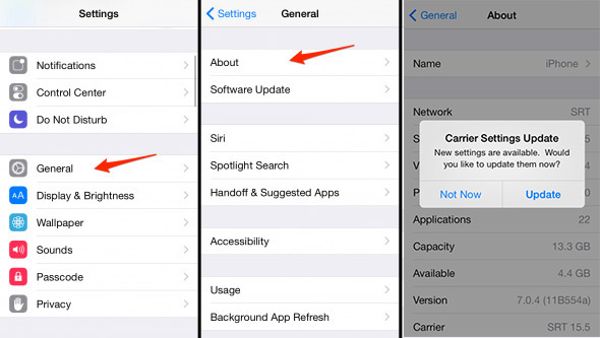
ejecutar el Ajustes aplicación, vaya a la General pestaña y seleccione Acerca de.
Espere unos segundos para que iOS busque la actualización. Si se le solicita, toque el icono Actualizar Botón para actualizar la configuración del operador.
Solución 4: Actualizar iOS
Si todavía usas la versión anterior de iOS, es hora de actualizar el software cuando el iPhone muestra el error de SIM no compatible. Apple corrige varios errores en cada actualización de software. Por lo tanto, es mejor que mantengas tu iOS actualizado.
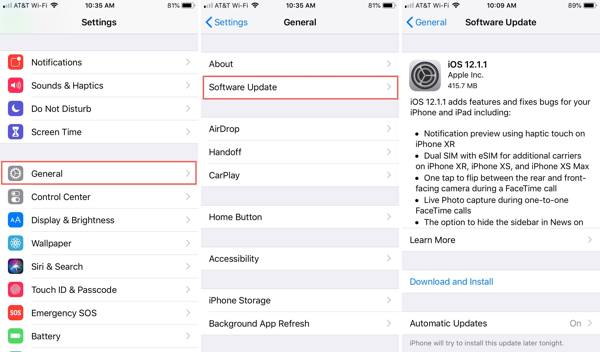
Ir General en el Ajustes aplicación
Tocar Actualización de software para buscar actualizaciones disponibles.
A continuación, toque el Descargar e instalar botón y siga las instrucciones en pantalla para actualizar el software en su dispositivo.
Solución 5: Restablecer la configuración de red
Restablecer la configuración de red es una solución práctica para corregir el error de SIM no compatible en el iPhone. Restablece la configuración de red al estado de fábrica, pero no borra los datos ni los archivos del dispositivo. Sin embargo, una vez que restablezca la configuración de red, se olvidará la conexión Wi-Fi almacenada. Puede compartir la contraseña de wifi desde otro iphone.
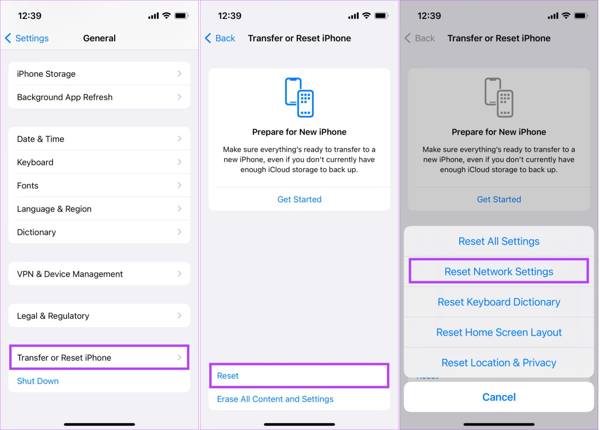
Ir General en la aplicación Configuración y seleccione Transferir o restablecer iPhone.
Tocar Reiniciary seleccione Reiniciar configuración de la red.
Cuando se te solicite, ingresa la contraseña de tu iPhone y comienza a restablecer el dispositivo. Espera a que finalice el proceso y reinicia el dispositivo. La tarjeta SIM debería funcionar normalmente.
Recomendado: La mejor herramienta para eliminar el bloqueo de activación
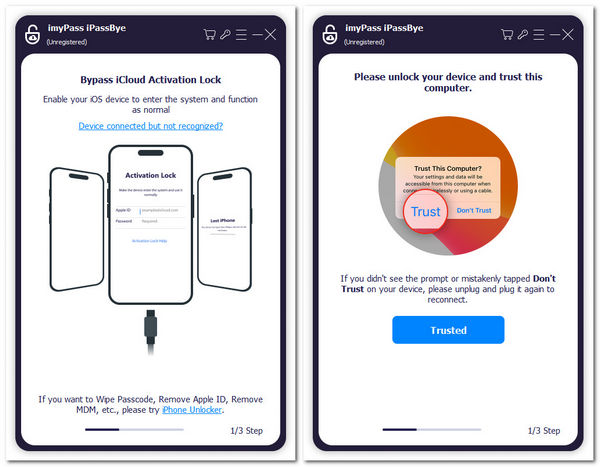
imyPass iPassAdiós es la mejor opción para eliminar el bloqueo de activación de iCloud de los dispositivos iOS. Integra funciones de nivel profesional de forma que todos puedan aprender a usarlas rápidamente. Eso la convierte en una buena opción tanto para principiantes como para personas comunes.

4,000,000+ Descargas
Eliminar el bloqueo de activación en el iPhone sin la contraseña.
Disponible en varias situaciones, incluido el modo perdido.
Fácil de usar y no requiere habilidades técnicas.
Admite la última versión de iOS y iPhones.
Conclusión
Ahora, debes comprender qué puedes hacer cuando el Tarjeta SIM de iPhone no compatible Se produce un error. Aunque las causas son complejas, nuestras soluciones pueden ayudarle a solucionar el problema de forma eficaz y rápida. imyPass iPassBye le permite eliminar el bloqueo de activación fácilmente.

Samuel es editor sénior de imyPass. Es experto en desbloqueo de contraseñas. Cuenta con más de cinco años de experiencia escribiendo tutoriales sobre desbloqueo de teléfonos.
Soluciones calientes
-
Consejos para iOS
-
Desbloquear iOS
-
Ubicación GPS
-
Consejos de Windows
