วิธีการกู้คืนรูปภาพ Facebook ที่ถูกลบไปโดยมีหรือไม่มีการสำรองข้อมูล
"ฉันลบรูปภาพของฉันบน Facebook ที่บันทึกไว้ที่นั่นเท่านั้น มีวิธีกู้คืนรูปภาพเหล่านั้นหรือไม่" ตามที่ Facebook ระบุ เมื่อคุณเลือกที่จะลบรูปภาพที่คุณแชร์บน Facebook รูปภาพเหล่านั้นจะถูกลบออกจากไซต์ รูปภาพบางส่วนจะถูกลบออกจากเซิร์ฟเวอร์และระบบสำรองข้อมูลของ Facebook อย่างถาวร รูปภาพบางส่วนจะอยู่ในระบบสำรองข้อมูลแม้ว่าจะไม่ปรากฏให้เห็นอีกต่อไป คู่มือนี้จะอธิบายวิธีการลบรูปภาพเหล่านี้ กู้ภาพที่ถูกลบจาก Facebook และรับภาพอันล้ำค่าของคุณกลับคืนมา

ในบทความนี้:
ตอนที่ 1: เกิดอะไรขึ้นกับรูปภาพหลังจากลบออกจาก Facebook
ดังที่กล่าวไว้ก่อนหน้านี้ ตราบใดที่คุณลบรูปภาพออกจาก Facebook รูปภาพนั้นจะถูกลบออกจากแพลตฟอร์มและเซิร์ฟเวอร์ ไม่มีถังขยะหรือถังรีไซเคิลที่มองเห็นได้บนโซเชียลมีเดียสำหรับบันทึกรูปภาพที่ถูกลบ กล่าวอีกนัยหนึ่ง รูปภาพจะถูกลบออกจาก Facebook อย่างถาวรเมื่อคุณลบรูปภาพนั้น
ส่วนที่ 2: วิธีทั่วไปในการกู้คืนรูปภาพที่ถูกลบบน Facebook
ไม่มีวิธีสำรองรูปภาพของคุณบน Facebook ในความเป็นจริง คุณไม่จำเป็นต้องสำรองเนื้อหาบน Facebook เนื่องจากแพลตฟอร์มโซเชียลจะจัดเก็บข้อมูลของคุณไว้ในฐานข้อมูล คุณสามารถร้องขอการดาวน์โหลดข้อมูลหรือกู้คืนรูปภาพที่ถูกลบจาก Facebook Memories ได้
วิธีการกู้คืนรูปภาพที่ถูกลบจาก FB โดยดาวน์โหลดไฟล์เก็บถาวร
บนโทรศัพท์มือถือ
เปิดแอป Facebook ของคุณ และลงชื่อเข้าใช้บัญชีของคุณ คุณต้องไม่ ลืมรหัสผ่าน Facebook ของคุณ.
ไปที่ เมนู หน้าจอจากด้านล่างเลือก การตั้งค่าและความเป็นส่วนตัวและเลือก การตั้งค่า.
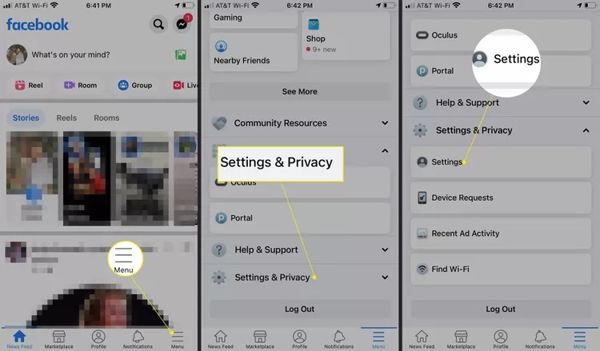
เลื่อนลงไปที่ ข้อมูลของคุณ ส่วนและแตะ ดาวน์โหลดข้อมูลของคุณ ปุ่ม.
ขั้นตอนต่อไป เลือกประเภทข้อมูลที่ต้องการและยกเลิกการเลือกข้อมูลที่ไม่ต้องการ ตัวอย่างเช่น หากคุณต้องการกู้คืนรูปภาพ Facebook ที่ถูกลบจากข้อความของคุณ ให้เลือก ข้อความ ตัวเลือก.
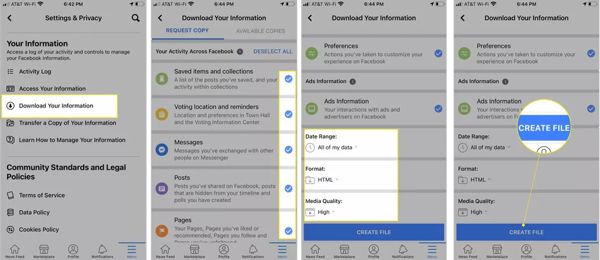
จากนั้นตั้งค่า ช่วงวันที่, รูปแบบ, และ คุณภาพสื่อ ตามความต้องการของคุณ โดยค่าเริ่มต้น ข้อมูลทั้งหมดของฉัน, เอชทีเอ็มแอล, และ สูง ถูกเลือกแล้ว
แตะ สร้างไฟล์ ปุ่มที่ด้านล่าง
หลังจากนั้นไม่กี่วัน คุณจะได้รับการแจ้งเตือนเมื่อการดาวน์โหลดของคุณพร้อมแล้ว จากนั้นทำตามคำแนะนำเพื่อดาวน์โหลดข้อมูลและกู้คืนรูปภาพ Facebook ที่ถูกลบทั้งหมด
บนเว็บ
เยี่ยมชม Facebook ในเว็บเบราว์เซอร์และเข้าสู่ระบบบัญชีของคุณ
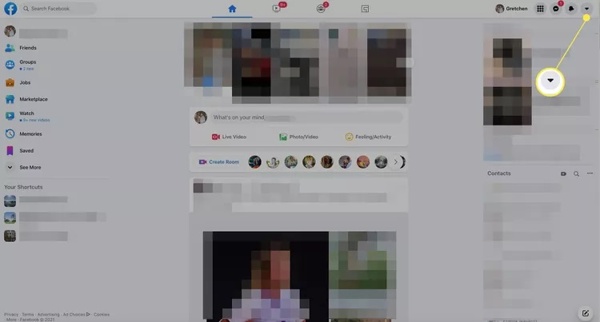
คลิก มากกว่า ปุ่มที่มุมขวาบน จากนั้นเลือก การตั้งค่าและความเป็นส่วนตัว, เลือก การตั้งค่าและเลือก ความเป็นส่วนตัว.
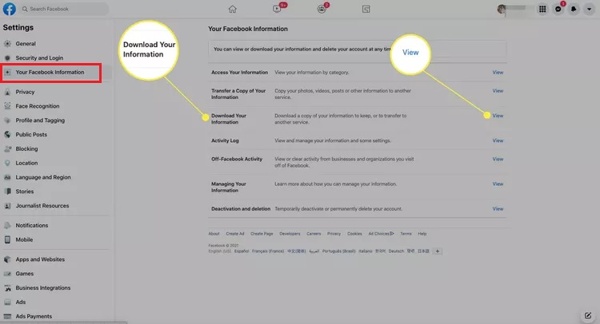
ไปที่ ข้อมูล Facebook ของคุณ แท็บจากด้านซ้ายและคลิก ดู ปุ่มถัดจาก ดาวน์โหลดข้อมูลโปรไฟล์ หัวเรื่อง
คลิก เลือกวันที่ ภายใต้ ช่วงวันที่ หัวข้อ และตั้งค่าล่วงหน้าหรือวันที่ที่เหมาะสม จากนั้นเลือก คุณภาพสื่อ และ รูปแบบ.
ถัดไป ตรวจสอบประเภทข้อมูลที่คุณต้องการดาวน์โหลด และคลิก สร้างไฟล์ ปุ่ม.
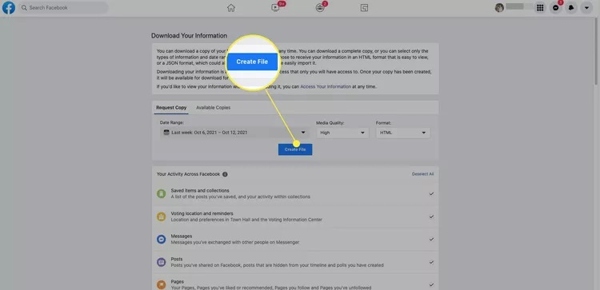
เมื่อคุณได้รับการแจ้งเตือนจาก Facebook ให้ทำตามคำแนะนำเพื่อเปิด ข้อมูล Facebook ของคุณ หน้าเว็บ จากนั้นเลือก ดู ถัดจาก เข้าถึงข้อมูลของคุณ เพื่อดูรูปภาพที่ถูกลบออกจาก Facebook
วิธีการกู้คืนรูปภาพที่ถูกลบออกจากความทรงจำบน Facebook
บนโทรศัพท์มือถือ
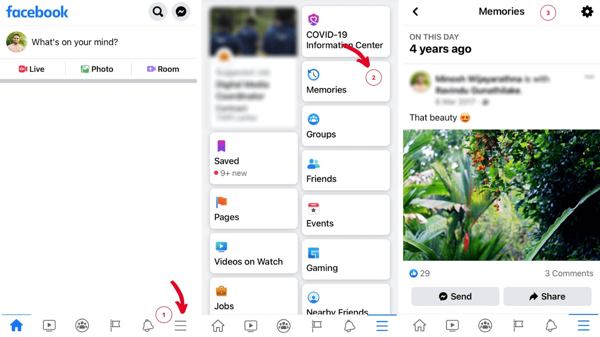
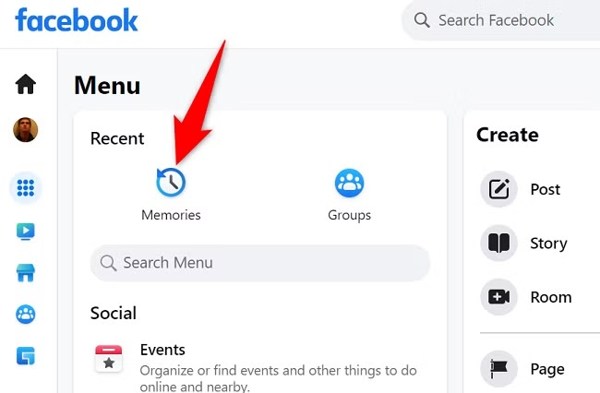
เลือก ความทรงจำ หลังจากลงชื่อเข้าใช้เว็บไซต์ Facebook แล้ว หากคุณไม่พบ ให้ไปที่ เมนูและเลือก ความทรงจำ.
คุณจะเห็นโพสต์ทั้งหมดของคุณในอดีตบน ความทรงจำ หน้าหนังสือ.
ขั้นตอนต่อไปคือดาวน์โหลดรูปภาพ Facebook ที่ถูกลบออกจากโพสต์
บนเว็บ
มุ่งหน้าไปที่ เมนู หน้าจอจากด้านล่างของแอป Facebook ของคุณ
แตะ ความทรงจำ ภายใต้ ทางลัดทั้งหมด ส่วน.
จากนั้นคุณจะเห็นโพสต์ทั้งหมดของคุณและคุณสามารถดาวน์โหลดรูปภาพที่ถูกลบออกได้
ส่วนที่ 3: วิธีการกู้คืนรูปภาพที่ถูกลบบน Facebook บน iPhone
หากคุณไม่สามารถค้นหารูปภาพ Facebook ที่ถูกลบไปจากข้อมูลดาวน์โหลดหรือความทรงจำ คุณจะต้องใช้เครื่องมือการกู้คืนรูปภาพ imyPass iPhone Data Recovery เป็นหนึ่งในซอฟต์แวร์กู้คืนข้อมูลอันทรงพลังสำหรับผู้ใช้ iOS ช่วยให้คุณกู้คืนรูปภาพที่สูญหายได้โดยไม่ต้องสำรองข้อมูล
คุณสมบัติหลักของการกู้คืนข้อมูล iPhone
1. กู้คืนรูปภาพ Facebook ที่ถูกลบบน iPhone ด้วยการคลิกเพียงครั้งเดียว
2. ดึงรูปถ่ายที่สูญหายจาก iTunes หรือการสำรองข้อมูล iCloud โดยไม่ต้องรีเซ็ตอุปกรณ์ของคุณ
3. สามารถใช้งานได้กับข้อมูลหลากหลายประเภท รวมถึง Facebook
4. ดูตัวอย่างรูปภาพที่ถูกลบบน Facebook เพื่อการกู้คืนแบบเลือก
5. กู้คืนรูปภาพ Facebook ที่ถูกลบไปโดยไม่ต้อง การรีเซ็ต iPhone ของคุณ.
วิธีการกู้คืนรูปภาพที่ถูกลบบน Facebook บน iPhone โดยไม่ต้องสำรองข้อมูล
เชื่อมต่อกับ iPhone ของคุณ
เริ่มซอฟต์แวร์กู้คืนข้อมูล iPhone ที่ดีที่สุดหลังจากที่คุณติดตั้งลงในพีซีของคุณ มีเวอร์ชันอื่นสำหรับ Mac ไปที่ กู้คืนจากอุปกรณ์ iOS แท็บจากด้านซ้าย เชื่อมต่อ iPhone ของคุณเข้ากับพีซีด้วยสาย Lightning ครั้งแรกที่เชื่อมต่อกับพีซี ให้แตะ เชื่อมั่น บนหน้าจอ iPhone ของคุณ จากนั้นคลิกปุ่ม เริ่มการสแกน ปุ่มเพื่อเริ่มค้นหาข้อมูลที่ถูกลบออกจากอุปกรณ์ของคุณ
เคล็ดลับ:หากคุณมีการสำรองข้อมูล iTunes หรือ iCloud ซึ่งอาจมีรูปภาพ Facebook ที่ถูกลบไป ให้เลือก กู้คืนจากไฟล์สำรองข้อมูล iTunes หรือ กู้คืนจากไฟล์สำรองข้อมูล iCloud แทน จากนั้นทำตามคำแนะนำเพื่อดึงภาพ FB ของคุณ
ดูตัวอย่างรูปภาพที่ถูกลบ
เมื่อเสร็จแล้ว ให้เลือกประเภทข้อมูลที่เหมาะสมจากด้านซ้าย ที่นี่เราเลือก รูปภาพแอป ภายใต้ สื่อมวลชน หัวข้อ ต่อไปดึงรายการด้านบนลงมา และเลือก แสดงเฉพาะที่ถูกลบเท่านั้นจากนั้นดูภาพขนาดย่อของรูปภาพที่ถูกลบ คุณสามารถเรียกดูภาพตามประเภท วันที่ หรือค้นหาภาพที่ต้องการด้วยคำหลัก
กู้ภาพ FB ที่ถูกลบไป
ตรวจสอบชื่อไฟล์ของรูปภาพ FB ที่ถูกลบที่คุณต้องการกู้คืน คลิก ฟื้นตัว ปุ่มที่มุมขวาล่าง จากนั้นคลิกปุ่ม เปิด ปุ่มเพื่อเลือกโฟลเดอร์เอาต์พุต โดยค่าเริ่มต้น โฟลเดอร์เอาต์พุตจะถูกบันทึกไว้ใน เอกสาร โฟลเดอร์ สุดท้ายให้คลิกที่ ฟื้นตัว กดปุ่มอีกครั้ง ไม่กี่วินาทีต่อมา คุณจะพบรูปภาพบนฮาร์ดไดรฟ์ของคุณ
บทสรุป
ตอนนี้คุณน่าจะเข้าใจวิธีการกู้คืนแล้ว ลบรูปเฟสบุ๊คออกคุณสมบัติการดาวน์โหลดข้อมูลในตัวช่วยให้คุณกู้คืนรูปภาพที่ถูกลบไปจาก Facebook ได้ แม้ว่าขั้นตอนการทำงานจะค่อนข้างซับซ้อน นอกจากนี้ Facebook Memories ยังเป็นอีกที่หนึ่งที่ให้คุณค้นหารูปภาพได้ imyPass iPhone Data Recovery เป็นโซลูชันที่ดีที่สุดในการกู้คืนรูปภาพ Facebook หากคุณมีคำถามอื่นๆ เกี่ยวกับหัวข้อนี้ โปรดเขียนไว้ด้านล่าง

