Cách khôi phục iPad từ bản sao lưu iCloud/iTunes và nhiều hơn nữa
Mặc dù iPad thường ít gặp lỗi hơn nhiều so với các thiết bị kỹ thuật số truyền thống, nhưng mất dữ liệu là một vấn đề lớn mà nhiều người dùng iPad đã gặp phải. Bạn có thể vô tình xóa các tệp quan trọng hoặc khôi phục cài đặt gốc thiết bị của mình do nhiều lỗi khác nhau. Tin tốt là bạn có thể phục hồi một chiếc iPad có hoặc không có bản sao lưu. Hướng dẫn này sẽ giải thích cách lấy lại dữ liệu của bạn từ bộ nhớ iPad, bản sao lưu iCloud hoặc bản sao lưu iTunes/Finder.

Trong bài viết này:
Phần 1: Bạn có thể khôi phục dữ liệu từ iPad không
Ngoài việc lấy lại dữ liệu đã mất, việc khôi phục iPad có thể mở khóa mà không cần mật khẩu, sửa iPad bị vô hiệu hóa và loại bỏ vi-rút cũng như trục trặc.
Khôi phục dữ liệu từ iPad không phải là một nhiệm vụ khó khăn. Thêm vào đó, bạn có nhiều hơn một phương pháp và cách lấy lại dữ liệu tùy thuộc vào tình huống của bạn. Nếu bạn sao lưu iPad của mình vào iCloud hoặc iTunes/Finder thường xuyên, bạn có thể khôi phục iPad của mình từ bản sao lưu một cách nhanh chóng. Tất nhiên, cái giá phải trả là xóa dữ liệu hiện tại trên iPad của bạn.
Ngay cả khi bạn không có bản sao lưu, bạn vẫn có thể khôi phục iPad của mình. Khi bạn xóa một tệp hoặc một mục trên thiết bị, nó sẽ không bị xóa khỏi bộ nhớ của bạn. Thay vào đó, không gian được đánh dấu là trống. Trước khi tệp bị ghi đè bởi dữ liệu mới, bạn có thể khôi phục tệp bằng công cụ khôi phục dữ liệu mạnh mẽ.
Phần 2: Cách khôi phục iPad mà không cần sao lưu
Như đã đề cập trước đó, bạn có thể khôi phục iPad ngay cả khi bạn không có bản sao lưu, nhưng bạn cần một công cụ mạnh mẽ. Từ thời điểm này, chúng tôi khuyên dùng imyPass iPhone Data Recovery. Nó quét dữ liệu bị mất trên bộ nhớ iPad trong nhiều trường hợp khác nhau, bao gồm cả trong Chế độ khôi phục.
Các tính năng chính của công cụ khôi phục dữ liệu iPad tốt nhất
1. Khôi phục iPad dễ dàng mà không cần mật khẩu hoặc sao lưu.
2. Trích xuất dữ liệu từ iCloud hoặc iTunes mà không cần đang thiết lập lại iPad.
3. Hỗ trợ hầu hết các loại dữ liệu trên thiết bị iOS.
4. Xem trước dữ liệu iPad để khôi phục có chọn lọc các mục cụ thể.
5. Có sẵn trên các phiên bản mới nhất của mẫu iPad.
Cách khôi phục iPad mà không cần mật khẩu hoặc sao lưu
Kết nối với iPad của bạn
Mở phần mềm khôi phục dữ liệu iPad tốt nhất sau khi bạn cài đặt nó trên máy tính của bạn. Phần mềm này tương thích với Windows 11/10/8/7 và Mac OS X. Chọn Phục hồi từ thiết bị iOS tab ở bên trái. Cắm iPad của bạn vào máy tính bằng cáp Lightning. Nhấn Lòng tin nếu iPad được kết nối với máy tính lần đầu tiên.
Nếu bạn muốn khôi phục iPad từ bản sao lưu iTunes hoặc iCloud, hãy chọn Phục hồi từ tệp sao lưu iTunes hoặc Phục hồi từ tệp sao lưu iCloudvà làm theo hướng dẫn trên màn hình để tiếp tục.
Xem trước dữ liệu iPad
Nhấn vào Bắt đầu quét để bắt đầu quét iPad của bạn. Khi hoàn tất, bạn sẽ thấy cửa sổ xem trước. Tại đây, bạn có thể kiểm tra dữ liệu có thể phục hồi trên iPad của mình theo danh mục. Nếu bạn chỉ muốn xem các tệp đã xóa, hãy chọn Chỉ hiển thị mục đã xóa từ danh sách thả xuống ở trên cùng.
Phục hồi iPad
Cuối cùng, hãy chọn các mục và tệp mà bạn muốn khôi phục và nhấp vào Hồi phục nút ở góc dưới bên phải. Sau đó đặt thư mục đầu ra và nhấn Hồi phục một lần nữa. Hãy giữ iPad của bạn được kết nối trong suốt quá trình.
Phần 3. Cách khôi phục lời nhắc đã xóa từ bản sao lưu iTunes
Khôi phục iPad từ bản sao lưu iCloud là một quá trình tương đối nhanh chóng. Nó hoạt động thông qua kết nối internet ổn định và không yêu cầu phần cứng bổ sung. Nhược điểm là bạn phải có bản sao lưu iCloud và khôi phục cài đặt gốc iPad của mình.
Chạy Cài đặt ứng dụng, chạm vào hồ sơ của bạn, chọn iCloud, và nhấn Quản lý lưu trữ.
Nhấn vào tên iPad của bạn để kiểm tra xem bạn có bản sao lưu iCloud không. Nếu không, hãy sao lưu trước.
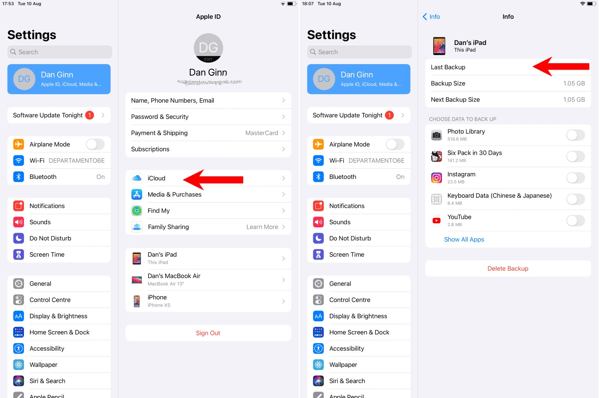
Quay lại Cài đặt màn hình, chọn Chung, và nhấn Chuyển hoặc Đặt lại iPad hoặc Đặt lại. Nhấn Xoá tất cả nội dung và cài đặt.
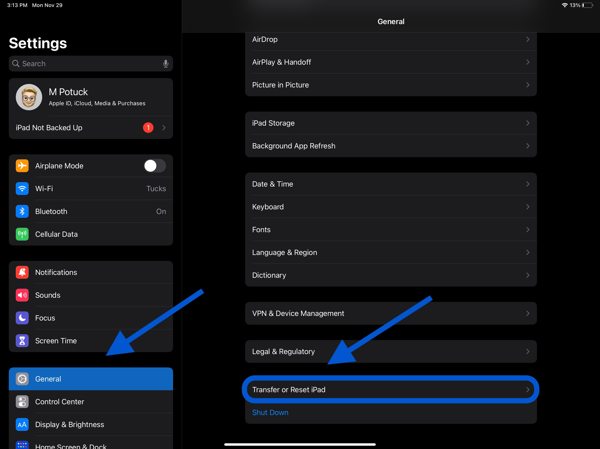
Nếu được nhắc, hãy nhập mật khẩu Apple ID hoặc mật mã iPad của bạn và chạm vào Tẩy xóa hoặc Tiếp tục để bắt đầu thiết lập lại thiết bị của bạn.
Khi quá trình khôi phục cài đặt gốc hoàn tất, hãy khởi động lại iPad và thiết lập nó như một thiết bị mới. Kết nối thiết bị của bạn với mạng Wi-Fi.
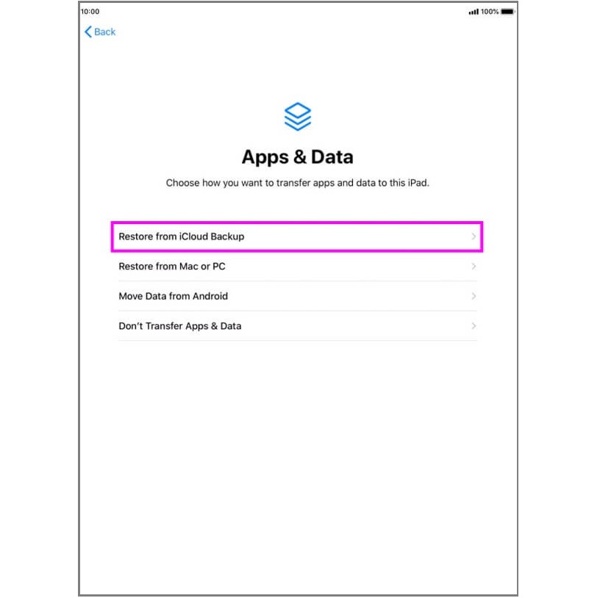
Hãy chắc chắn để lựa chọn Khôi phục từ bản sao lưu iCloud trên Ứng dụng & Dữ liệu màn hình. Đăng nhập vào tài khoản của bạn bằng ID Apple và mật khẩu, sau đó chọn tệp sao lưu phù hợp để khôi phục từ bản sao lưu trên iPad.
Sau đó hoàn tất quá trình thiết lập.
Phần 4. Cách khôi phục iPad từ bản sao lưu iTunes
Một số người thích sao lưu thiết bị iOS của họ vào máy tính một phần vì dung lượng lưu trữ đám mây hạn chế. Tất nhiên, bạn có thể khôi phục iPad bằng bản sao lưu iTunes. Thêm vào đó, đó là giải pháp hiệu quả để khắc phục nhiều lỗi khác nhau bao gồm cả việc đặt lại mật mã iPad đã quên.
Sử dụng cáp tương thích để kết nối iPad của bạn với máy tính mà bạn đã sử dụng để sao lưu thiết bị. Đảm bảo tắt Tìm iPad của tôi nếu bạn đã bật.
Nếu thiết bị của bạn bị vô hiệu hóa, bạn phải khôi phục iPad ở Chế độ khôi phục.
Đối với iPad có nút Home, hãy giữ Bên + Trang chủ cho đến khi màn hình Chế độ khôi phục bật lên.
Đối với iPad không có nút Home, hãy nhanh chóng nhấn và thả nút Tăng âm lượng nút, và làm tương tự với Giảm âm lượng nút. Sau đó giữ Bên cho đến khi bạn thấy màn hình Chế độ khôi phục.
Bây giờ, hãy kết nối iPad với máy tính bằng cáp USB.
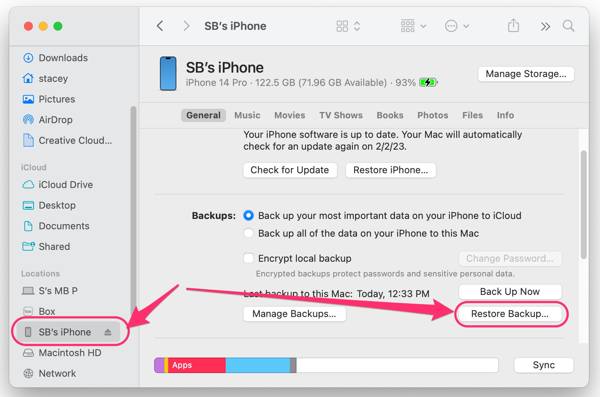
Chạy iTunes trên Windows và macOS Mojave hoặc phiên bản cũ hơn, nhấp vào Điện thoại nút ở góc trên bên trái và đi đến Bản tóm tắt tab. Trên macOS Catalina hoặc mới hơn, hãy chạy ứng dụng Finder, nhấn vào tên iPad của bạn và định vị Tab chung.
Nhấn vào Khôi phục bản sao lưu nút dưới Sao lưu tiết diện.
Kéo xuống tùy chọn bên cạnh Sao lưu, chọn một tệp sao lưu thích hợp và nhấp vào Khôi phục nút. Bạn cũng có thể phải nhập Mật khẩu sao lưu iTunes. nếu bạn đã từng thiết lập nó.
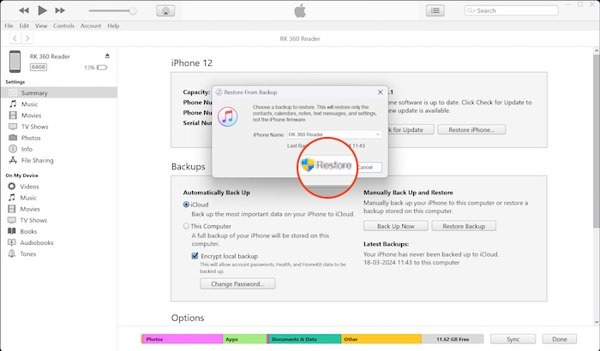
Khi được nhắc, hãy nhấp vào Xóa và khôi phục trên hộp thoại bật lên. Sau đó thiết lập iPad của bạn và hoàn tất khôi phục bằng iTunes.
Sự kết luận
Bây giờ, bạn nên hiểu cách phục hồi iPad với iCloud và iTunes/Finder sao lưu hoặc không sao lưu. imyPass iPhone Data Recovery cho phép bạn khôi phục dữ liệu đã mất từ bộ nhớ iPad mà không cần sao lưu. Quan trọng hơn, nó sẽ không xóa dữ liệu hiện tại trên thiết bị của bạn. Nếu bạn có câu hỏi khác về chủ đề này, vui lòng viết chúng bên dưới bài đăng này.

